Wouldn't it be fun if....
While working in the viewport wouldn't it be nice if the thing you rendered was faithfully represented in the viewport? At least as faithfully as technically possible?
Wouldn't it be neat if the left part of the below was the final render and the right part would be what you saw in the viewport, while working with it?
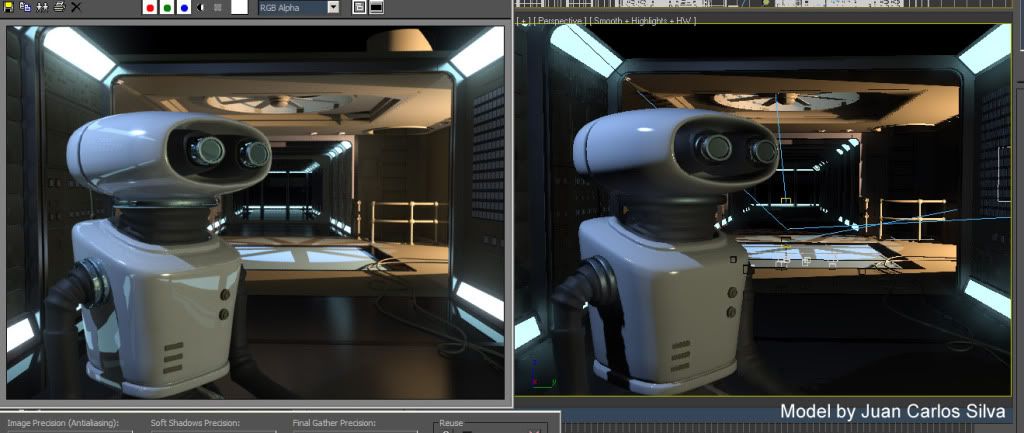
(click to enlarge)Oh wait - that is exactly how it looks in
3ds Max 2010! Oh no, how can this be? Is it magic? Is it elves? No, it's MetaSL, and mental images mental mill technology.
What happens in 3ds Max 2010 is that several of the shaders has been given an implementation in the MetaSL shading language. MetaSL is mental images
renderer agnostic shading language. When this shading language is taken through the
mental mill compiler, out the other end drops something that can fit multiple different graphics hardware, as well as several different renderers!
This way, no matter if the graphics hardware is NVidia or ATI, you will see the same thing (or as close as the card can afford to render) using only a single MetaSL source shader.
Viewport accuracy
Look at this image, which is the difference between the render (on the left) and the viewport in the previous version, 3ds Max 2009:
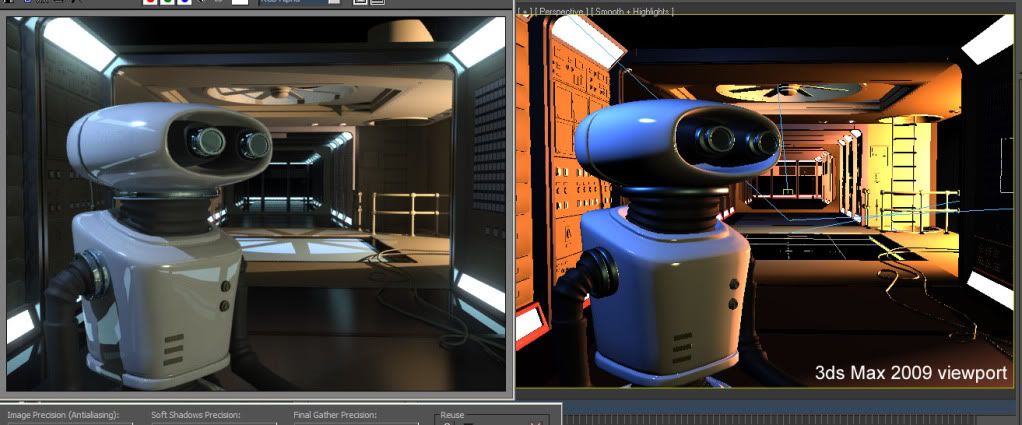
(click to enlarge)Notice how horrible the viewport (on the right) looks, how harshly lit, unrealistic, and oversaturated it looks? The thing to take home from this is that the
main reason that this looks
massively different is that the image on the right is neither gamma corrected, nor tone mapped.
I mention this to illustrate the importance, nay,
imperativeness of using a proper linear workflow, with a gamma corrected and tone-mapped image pipeline.
So while the lighting and shading
itself is much more accurate in 2010 than 2009, the
key feature that really causes the similarity between the render and the viewport is the tone mapping and gamma correction.
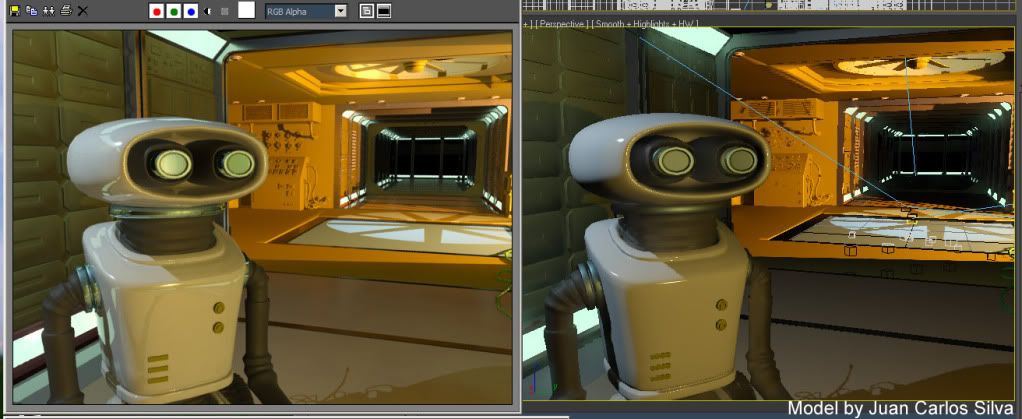
But naturally, the additional accuracy of the shading and lighting drives this home even more: See below a couple of different lighting scenarios, and see how well they match the render (again, render on the left, viewport on the right):
(click to enlarge)After playing around a bit (tip; use the 3ds Max "light lister", you can get:
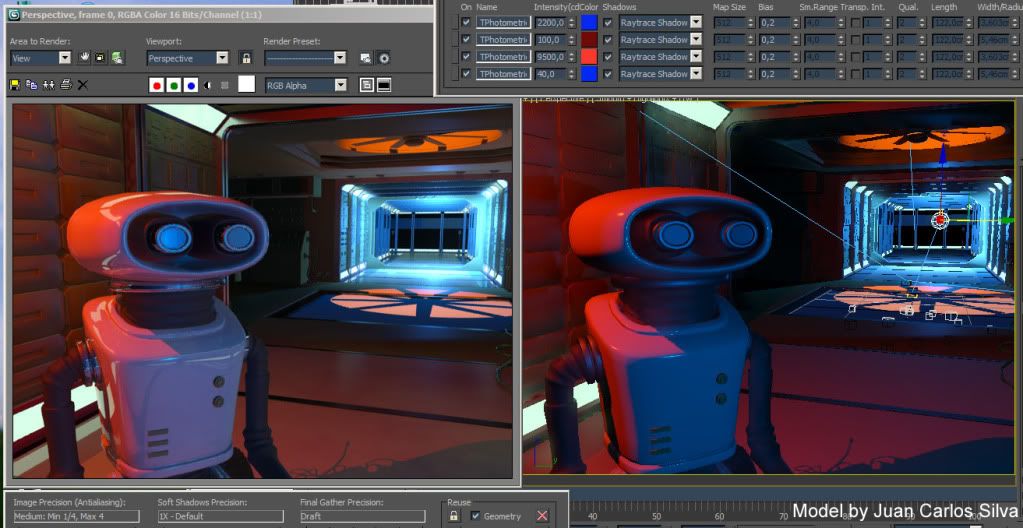
(click to enlarge)So, using this feature, with the help of the MetaSL technology, you can make a decent set of lighting decisions and "look development"
in realtime in the viewport. That's
pretty neat, if I may say so myself ;)
So what about mental mill
Now nothing of the above is the end-user using mental mill. It is still
using the mental mill compiler "under the hood"; MetaSL versions of 3ds Max shaders are compiled for the hardware, and used in the viewport.
But in 3ds Max 2010, the
end user can also use MetaSL and mental mill directly. And yes,
not only for hardware rendering in the viewport, but for
mental ray rendering as well!!First, please note that this is a 1st step integration of mental mill into 3ds Max. It has some issues (we know some quite well), and even a couple of bugs snuck into the final release (we are also very aware of these). But the general workflow is that you:
- Create a shade tree inside the mental mill Artist Edition that ships with 3ds Max
- Save this as an .xmsl file
- Insert a "DirectX material" (yes, this makes you think this is only for HW rendering, since in the past "DirectX material" was only used for such things)
- Load the .xmsl file into it
- See the material in the viewport and render it with mental ray!
Now, as I mentioned above, there are some known issues in this 1st integration, to be aware of:
- In mental mill you always have to build a Phenomena, not just a free standing shade tree. So your workspace in the mill should contain a single Phenomena representing your new material.
- The last node must have a single output. This is actually a bug, and it will be fied, but for now, if your root node has many outputs (like for example the Illumination_Phong does), just pipe it's main output through some other shader (like Color_Brighness or similar) to make sure the final output node only has a single output.
- Due to a difference in texture coordinate handling in 3ds Max mental ray and MetaSL, UV coordinates must be connected explicitly. So if you include, say, a texture looup node, you must include a "State_uv_coordinate" node to feed it coordinates. Inside mental mill you will really not see any difference, since the built in "default UV's" work there, but without doing this mental ray will render it incorrectly.
- There was recently discovered an issue with localization; it seems that if your Windows system is set to use "," rather than "." for the decimal separator, this causes an error in interpreting some MetaSL code. For now, the workaround is to change your windows decimal separator settings to "."; sorry for the inconvenience :(
- While you can change the shader in the mill and re-load it into the DirectX material and see the viewport update, the mental ray loaded version of the shader will not update automatically; be careful about this. You can force an update by renaming the phenomena and the file so mental ray loads it as a "new" shader.
Having taken the above things into account, though, your MetaSL shader should render pretty much exactly the same in mental ray as they appear in the viewport!
Some really snazzy things can be rendered thusly.
mental mill Standard Edition
The "Artist Edition" of mental mill sipping with 3ds Max can only work with the shipping nodes, not custom MetaSL nodes. It can also only export hardware shaders. (While this may sound like a contraditction to what I said above, note that you are not exporting the
shader from mental mill in the 3ds Max 2010 workflow, you are saving the
mental mill project (.xmsl) itself, and it is 3ds Max that is able to
load this
and render it in mental ray.)
If, however, you are a shader developer that want to write
custom MetaSL shaders and render these in both mental ray and see them in the viewport, you need the mental mill "Standard Edition". This product can be purchased over the newly snazzily updated
www.mentalimages.com website.
Enjoy the fun!
/Z


 Now, Unified sampling unifies (hence the name) spatial and temporal sampling. Each ray has it's own space AND time sample. And not only that, the convergence of both is adaptive, so you simply set a lower limit on the amount of rays (say, 1) and an upper limit (say, 100) and simply turn a quality knob. This tries to adaptively resolve any noise from any source, be it soft shadows, glossy reflections, or motion blur with the SAME oversampling scheme.