As usual, when the same question pops up in multiple places, I tend to turn this into a blog post. The question I was asked recently was how to use ambient light in mental ray (specifically, in mental ray in 3ds Max), because people were confused about the lack of an "ambient" slot in, say, the mia_material (Arch & Design) shader.
I will try to explain this here.
THEORY: "Ambient Light" and "Occlusion" - a primer
Back in the day...
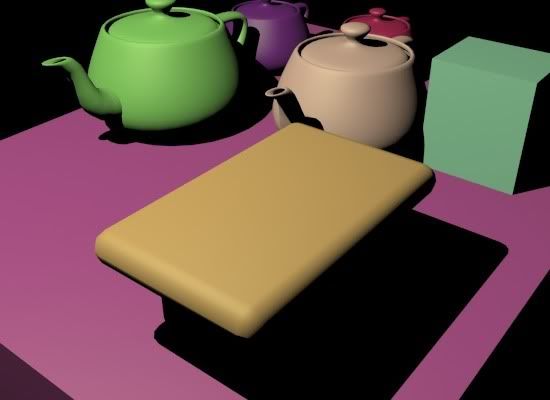
Traditional computer graphics, with no indirect lighting of any kind, would by default look like this; here's a scene lit with a single shadow-casting directional light:

I.e. shadows are pitch-black, with no realism whatsoever. You can't even tell that the yellowish rectangular thing at the bottom is a table that has legs!
So a couple of tricks were introduced. One ugly, unrealistic hack was "shadow density", i.e. the ability to say "when light from this light is in shadow, only x% of it actually disappear". So you could set things like "Shadow Color" and "Shadow Density", which you all understand is completely absurd and totally contrary to any form of sanity and logic.
An opaque object either blocks light, or it doesn't - it doesn't just randomly go "Oh I block 47% of the light". That can't happen (outside of actually transparent objects).
RULE#1: Never, ever, no matter how "old-school" your rendering techniques are, use "shadow color" or "shadow density" settings. Ever. Trust me on this.
Enter "Ambient" light
"But", these early CG people said, "outdoors shadows from the sun is slighlty blue, shouldn't I set a shadow density and color to get my blue shadows"?
NO!!The reason "shadows are blue" is because they are filled in by blue light from the sky.
Now, our early CG pioneers understood this, of course, so rather than the horrendeos hack of "shadow color", they introduced a nearly-as-horrendous hack:
Ambient Light.
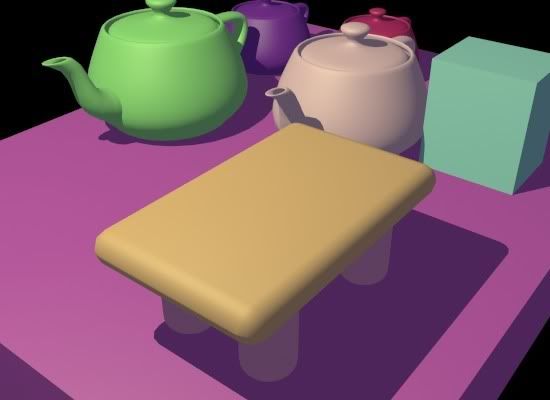
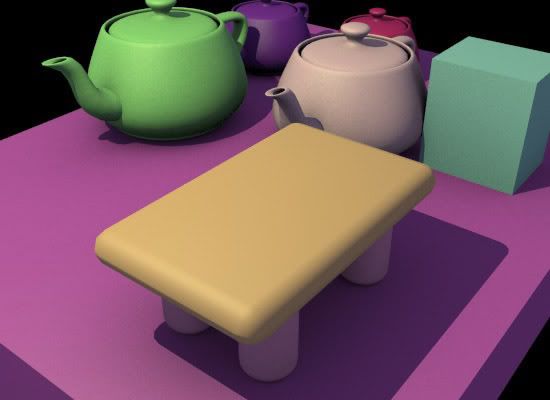
But the problem was, this "Ambient Light" was ever-present and uniform, and yielded a totally unrealistic and unsatisfactory result when used on it's own, something like this:

That looks about as horrible as the original: Sure, you can see
something in the shadows - but it's all totally uniformly lit. The "legs" of our table can now be seen... but as totally uniformly colored blobs, with nothing to reveal their shape.
Are these round legs, or are they flat oval things, or what are those? Does the legs touch the floor, or are they hovering above it? The purple teapot looks almost flying, because the shadow behind the green teapot is just a flat color.
The problem here is that light is hitting every point
uniformly, with
no regard to the position or angle of the surfaces. But if we are trying so simulate "blueish light from the sky", then a point that is exposed to a lot of the sky will receive more light, than a point that is beind a bunch of other objects that are blocking (i.e. "occluding") the skylight.
Enter "Occlusion"
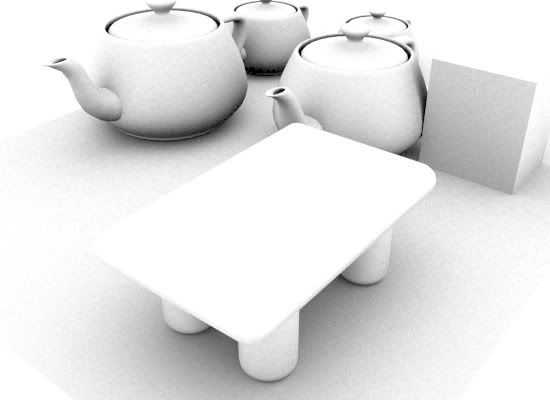
Luckily, some bright people at ILM back in 2002 when they were working on "Pearl Harbor" invented (using mental ray, I should add) something called "Ambient Occlusion". Basically, they wrote a shader that figure out how "occluded" a certain point was, i.e. how much stuff was "blocking light from arriving" at that point. This "Occlusion" on it's own looks like this:

Combining "Ambient" and "Occusion"
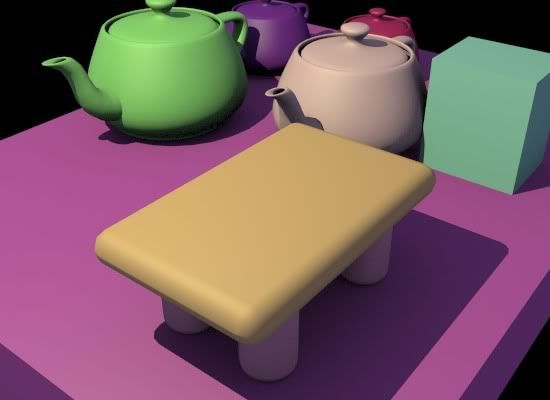
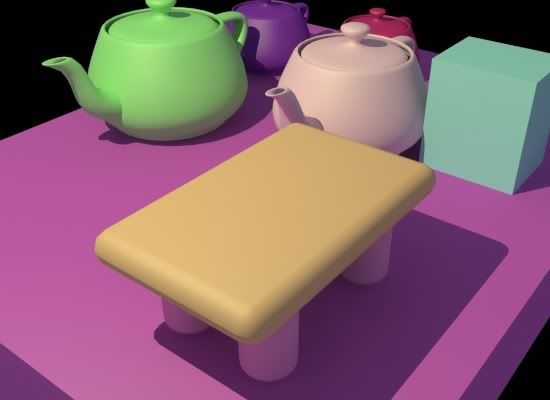
Now, if you apply this to the
Ambient term, you get this very much nicer image:

See how beautifully the details resolve; the legs of the table now correclty reads as "contacting" the floor; the shape of the legs can be perceived. The area between the teapots is properly darkened, and the teapots have nice contact shadows.
The above is how it should be done!Doing it the WRONG way
However, unfortunatly, many people have read and
misunderstood the original ILM documents on Ambient Occlusion, and apply the Occlusion pass
across the entire rendering. This is
W R O N G!!
I.e. people make "plain" render (including ambient light and everything), make an occlusion pass, and just multiply the two in post!
The result is that you get a deceptively-sort-of-okay-but-somwhat-wrong looking result like this:

Notice how this has a "dirty" feel. This is because the occlusion pass (pictured above) was applied on top of the
entire image, affecing the "ambient" light
as well as the directional light.
But this makes no sense; the "occlusion" of the directional light is already taken into account - that's what the shadow of the light
is. Ambient occlusion isn't called "
ambient occlusion" for no reason; it's supposed to be applied to the "ambient" term, i.e. the "omnidirectional surrounding light",
not to any direct lights.
But in the above image you will see darkening on floor in front of the objects, making it appear "dirty". Similarly, there is a bad looking "dirt-shadow" of the teapots spout on the front of the teapots. And so on.
SO: Globally multiplying occlusion on top of the beauty pass (including reflections, direct light, etc) is WRONG.
Don't do it.
But isn't this all fake? Why are we doing it?
Now... all we are doing with our "ambient" light and the "occlusion" is simulating "omnipresent light" (i.e. light from the environment) as well as "bounce light" (from other objects). Lets compare the result with
actually calculating omnipresent light and bounce light; i.e. use Final Gathering and calculate it FOR REAL:

The above image uses FG and a 3ds Max "Skylight" (i.e. light from the environment in XSI or Maya) to introduce the same kind of light we tried to "fake" with the "ambient" light - but
correctly. And with
true indirect bounces!So this results begs the question; when we so easily can get the
correct result, why would we still want to go the "fake" route?
There are a couple of answers:
- FG is an interpolated technique. This means that the indirect lighting is sub-sampled (calculated less than for every pixel) and the values between those are interpolated. However, if you are doing an animation, and the result between two frames are slightly different (for whatever reason), this may - hypothetically - cause not one pixel to change, but a large area of pixels to change (i.e. all pixels influenced by the interpolation of that FG point).
The result, in a final animation, will be visible flicker. Visible, because it is "macroscopic", i.e. larger than a pixel, and perceived as "scintillation" or "flicker", which is visually unappealing.
Contrast this with using the occlusion technique: It is calculated for every pixel (every sample, even), and hence, any noise in this calculation is of sub-pixel size. I.e. a difference from one frame or another will only affect at most one pixel, and mostly just a fragment of a pixel.
The result is that this perceived more as "film grain", and is much less visually objectionable.
- We may actually want to combine both "real" and "fake"; this is a method I often advocate.
You use FG at a low density and with high interpolation, and you apply your occlusion on top of this indirect light, rather than some homemade, arbitrarily invented "ambient" light. This relieves you of the responsibility of having to figure out the proper intensity and color of this mythical "ambient light" - it is calculated for you.
And of course, this combo method is a built in as a feature in Arch&Design/mia_material...
PRACTICE: How do we actually do this?
Since the original questions was in a 3ds Max context, I will answer (for now) in a 3ds Max context, but also mention the methods for XSI and Maya in the text.
There are three basic methods to apply ambient light:
- Use the built in AO of Arch&Design/mia_material and utilize it's "Ambient" parameter
- Use a light set to "Ambient Only"
- Use a light with the Ambient/Reflective Occlusion shader as light shader.
Method #1: Arch&Design (mia_material) ambience
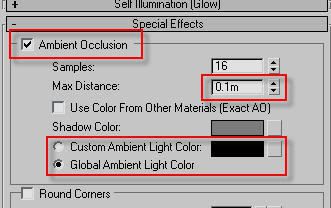
This method allows you either per-material or global ambient light levels, and you can easily modify the ambient occlusion radius from the rollout:
- Open the material in the material editor
- Go to the "Special Effects" rollout.
- Turn on the "Ambient Occlusion" and...
- ...EITHER put in a given ambient light color in the material...
- ...OR: switch to the "global" mode, which will use the "ambient" color and intensity from the Environment dialog box:

In XSI and Maya this means enabling the built in AO of mia_material, and setting the "ao_ambient" parameter to the color of your desired ambient light.
Method #2: "Ambient Only" light
(AFAIK, this specific method only works in 3ds Max. Correct me if I am wrong.)
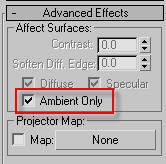
- Create an Omni
- In it's Advanced rollout, set the light to "Ambient Only"

This gives you plain (flat) ambient light with no occlusion.
To get the occlusion effect by adding the
Ambient/Reflective Occlusion shader as the "Projector Map" of the light.
BUT - There is a big BUT - For this to work, you MUST have the light with it's transformation reset, i.e. it must be placed at 0,0,0 in the top viewport, or the ambient occlusion shader will be confused.
Doing this manually is tricky; so it can be done much easier with a script:
myLight = Omnilight()
myLight.AmbientOnly = true
myLight.projectorMap = Ambient_Reflective_Occlusion__3dsmax()
To run this script:
- Go to MaxScript menu
- choose "New Script"
- paste the above snippet in
- hit CTRL-E
You will now have a set up light, where you can modify it's intensity and color etc. w. the normal 3ds max light features. The only thing you need to look out for is if you wan to set the distance for the ambient occlusion rays, you must
- take the Ambient/Reflective Occlusion shader that is in the projector map
- drag-and-drop it into the material editor
- choose "Instance"
- ...and modify the settings from the material editor
Method #3: "Ambient Only" light w. occlusion shader as light shader
There is actually a Method#3 which is similar to Method #2, except rather than placing the
Ambient/Reflective Occlusion shader in the "Projection Map" slot, you use that shader as the light shader of the light itself.
A quirk of this methods is that now the shader completely replaces all the settings of the light; all controls for color, intensity, etc. stop working, and you need to do all changes to the light intensity and color by modifying the color of the "bright" slot of the occlusion shader itself (by putting it in material editor, as above).
This method has the benefit of not requiring the strange "light has to be in 0,0,0" requirement, plus that it is a method that works as well in Maya and XSI. To do this in XSI or Maya:
- Create an area light
- Set it's area light type to "User" and 1 sample
- Use the mib_amb_occlusion shader as the light shader of the light
Similar to 3ds Max, changes to the "ambient light level" will now have to be done entirely from inside the occlusion shader.
Hope this helps.
Mo' later.
/Z


