Showing posts with label motion blur. Show all posts

2007-10-30

Production Shader Examples

So, who wants to know more about the production shaders? Raise of hands? (See the introductory post, if you missed that.)


OK, I don't have time for an extravagant essay right now, but what I did do is to put a set of examples online.

The example uses some geometry (in some cases, our friend "Robo" pictured here on the right) and shows how to use this together with the production shaders, both to introduce our geometry into various backgrounds, as well as using features like the motion blur and motion vector code.

General Overview


The Production library does a lot of things, but one of it's specialties is to help us to integrate a CG object into a photographic background, with the help of a photo of the background and a photo of a mirror ball taken at the same location in the same camera angle as the background photo. So, to play with that, we need a set of backgrounds, with matching mirror ball photos.

As luck would have it, I happen to have just that. (Amazing, innit?) ;)

These backgrounds are available in this backgrounds.zip file. Please download that and unzip before downloading any of the demos scenes (I also apologize for not having time to put Robo into any of the Maya scenes, but he was out at a party the day I made those file and didn't come home until late....)

In a hurry?


If you don't want to read, but play play play, you can go directly to this directory and you will find the files.

Examples for 3ds Max 2008


The 3ds Max demo scenes are sort of "all in one" demos, demonstrating a scene using the mip_matteshadow, mip_rayswitch_environment, mip_cameramap and mip_mirrorball to put a CG object into a real background as described in the PDF docs.
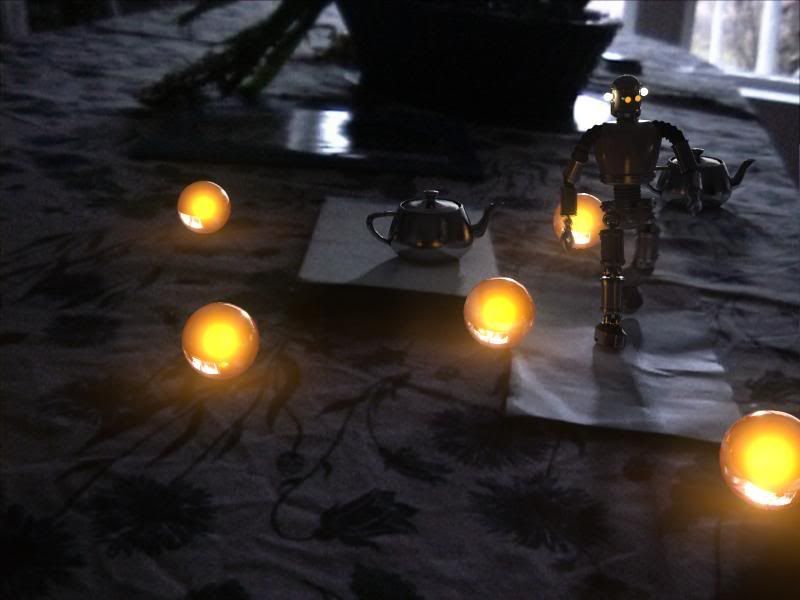

The file robot-1.max puts Robo in my back yard, robot-2.max puts him on my dining room table, robot-3.max on a window ledge, robot-4.max out in a gravel pit (how absolutely charming place to hang out) and finally robot-5.max on my dining room table but at night, and some alien globules has landed...


They all work pretty much the same, i.e. the same settings only swapping in different backgrounds and mirror ball photos from the backgrounds.zip file.

The exception is the file robot-4-alpha.max which demonstrates how to do the same as robot-4.max does, but set up for external compositing (see more details below in the Maya section).


Examples for Maya 2008


The examples for Maya are more "single task" examples, and demonstrates one thing at a time.

mip_matteshadow1.ma and mip_matteshadow2.ma both demonstrate how to put a set of CG objects into a real background, using the exact same techniques as for 3ds Max above:
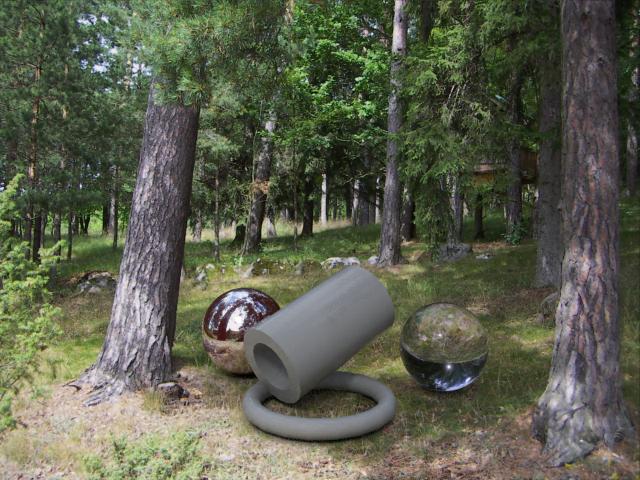


The file mip_matteshadow2b.ma demonstrate the same scene as mip_matteshadow2 but set up for external compositing (what is called "Best of Both Worlds" in the manual).

To recap from the manual briefly: In the normal mode (when you composite directly in the rendering and get a final picture including the background right out of the renderer, you use mip_cameramap in the background slot of your mip_matteshadow material, and in your global environment (in the Camera in Maya, in the "Environment" dialog in 3ds Max) you put in a mip_rayswitch_environment, which is being fed the same mip_cameramap into it's background slot, but into it's environment slot it is being fed a mip_mirrorball.

To do the "Best of Both Worlds" mode (to get proper alpha for external compositing, and not see the background photo in the rendering - but yet see its effects, its bounce light, its lighting, its reflections, etc. - one need to do a couple of changes from the above setup:


  • In the global Environment should still be a mip_rayswitch_environment as before, the only difference is that instead of putting mip_cameramap into it's background slot, you put transparent black (0 0 0 0).

    The trick in Maya is that you cannot put an alpha value into a color slot. We can cheat this by using the mib_color_alpha from the base shaders, and set its multiplier to 0.0.

  • In the background slot of your mip_matteshadow you used to have a mip_cameramap with your background. What you do instead, is to put in another mip_rayswitch_environment, and into it's environment slot (important, yes, the environment and NOT the background!) you put back the mip_cameramap with your background photo, and in it's background slot you again put transparent black (using same trick as above).


Having done this (as is already is set up in the mip_matteshadow2b.ma example) you will get this rendering:


This image contains all the reflections of the forest, the bounce light from the forest, the reflection of the environment from the mirror ball... but doesn't actually contain the background itself.

However, it has an alpha channel that looks like this...


...which as you see contains all the shadows. So compositing this image directly on top of the background in a compositing application, will give you the same result as the full image above, except with greater control of color balance etc. in post.

Maya in Motion


There is three further example files for Maya:

mip_motionblur.ma, which demonstrates the motion blur, and mip_motionvector.ma and mip_motionvector2.ma who both demonstrate how to output motion vectors.


I know these are rudimentary examples, but the day only has 48 hours... ;)

To quote the Governator: "I'll be bak".

/Z

2007-09-28

Famous mental ray myths...

Rusty Teapots Unite

There is a lot of misinformation out in the world, misunderstandings that gets repeated and turn into "truths" over time.

I ran into a couple of those at EUE and frankly, I had no idea they were so widespread. So from now on, any time I run into these I'm gonna make a post about it.... here's a collection:

You should always use the mental ray shaders, not the built in max/maya/xsi/whatever...


This myth is both true and false at the same time.

The reality is, there are a ton of "mental ray" shaders, from the very old and very primitive "base" shader library (danger) to very new and very modern "architectural" and "production" shader libraries.

So - yes - if there is a brand new shader that comes directly from mental images that does X, and your embedded application may have some other shader that claims to do X as well, then most likely picking the "mental ray" one is better.

But if there is some ancient shader, from the mists of pre-cambrium, that has a "mental ray" variant, and your application has something that looks as nice, is better integrated, etc.... use that in your application

As an example: The base shader library contains a set of shaders like mib_illum_phong, mib_illum_blinn etc.... never use those! Those are the simplest, most primitive shaders. Avoid!

Much rather than anything "mib_illum_blinn" use the Maya "Blinn" or the 3ds max "Standard" material in "Blinn" mode, or whatever. But even better, use the mental ray mia_material (Arch&Design in max). This is new, mental ray optimized, and we try to integrate it as much as possible into each app.

The old rusty mib_illum_* shaders will have all sorts of issues, interface poorly with the product (no render elements/channel support, no support for diffuse/specular switches on the lights, etc.), handle indirect illumination incorrectly, and so on.

Your apps own integrated materials are mental ray translations of the applications software-renderers material to the "best possible" mental ray counterpart. Your apps own materials are the one most guaranteed to interface with the app's own "features", such as specual switches on light, render channels, whatnot.

And then the mia_material(_x) ("Arch&Design") which we try to make as a "top of the line" thing, and we really try to integrate with as many of the applications own feature as humanly possible.


If it doesn't say "mental ray" dont use it


Similar to above, people have gotten the idea that if a feature doesn't explicitly say "mental ray" or "mr" on it, it is directly unsuitable for use with mental ray.

While this may happen in some odd cases, most of the time, most application features are actually quite well integrated with mental ray.

One of the most scary thing I heard at EUE was someone who asked "You can't use the 3ds max photometric lights with mental ray, right?".

I almost fell off my chair. If you want to render anything even remotely physically correct you should always use the photometric lights. But this guy had been misled by some other lights in the non-photometric category having "mr" in the name.

The reality is that those lights (The "mr Omni" and "mr Spot") are simply lights supporting things that do not exist at all in the other 3ds max lights.

All 3ds max lights are "mental ray lights" when you render with mental ray. Those two simply expose things that only mental ray can do. This does not mean the others "don't work" with mental ray, or that others are "unsuitable" for mental ray.

(Of course, in the case of max lights, what actually is unsupported in mental ray is the 3ds max "trick" to do "area shadows" on any given light, you instead have to make it a real area light. Hence the "extra" light types, although one could argue that perhaps this distinction could have been hidden away from the user in some other way. Alas, water under the bridge....)

So: Please use the photometric lights!

Never use Shadow Maps


This "myth" is the truest of them all. Yes, most of the time you really shouldn't use shadow maps with mental ray (you should use area lights). As a matter of fact I think at least 3ds max ships with shadow maps globally disabled in the mental ray render globals.... this is simply to get around the fact that max lights actually default to shadow maps.

However, there is a couple of cases where you should use shadow maps. And not just any shadow maps - the mental ray detail shadow maps: Hair. Fur.

Yes - any time you want to render hair, that's the time you whip out the rasterizer and detail shadow maps. Not for an architectural interior, but for your fuzzy sidekick in your space drama!


mental ray is slow


Actually mental ray is very fast, if you do things correctly. If you don't do things correctly it - as well as any other renderer - can be very slow.

First of all - suboptimal defaults. If an application ships with a default final gather setting of 500 rays, a way too low spatial oversampling contrast of 0.002 (which makes very little sense), and the default number of motion blur samples set to "19" when "5" is quite enough, of course it will appear slow.

Fixing all those settings can speed it up an order of magnitude.

But yes, I always get this "PRMan displaces faster" stuff. Of course it does.... until you actually trace a ray.

You see, PRMan lives in mindset where raytracing is so slow that you avoid it like the plague. So it uses a completely different method to render things (the REYES engine) which micro-dices things and spits the micro-polygons into subpixels then into pixels. The very nature of this algorithm gives you displacement practically "for free". Coz they work one micro-poly at the time, and never have to keep a single thing in memory.

A raytracer on the other hand (I alost said "a real renderer" *grin*) would out of necessity need to keep all those poly- and micro-polys in memory to have to intersect rays against. So not only do they need to be created, stored in memory, an accelleration structure must be built to speed up the ray intersections. All taking - yes - more time and complexity than dinking away one micropoly at the time and throwing the results over your shoulder when you are done.

The thing is that in PRMan, if you try to shoot a ray, it too has to do all those things. So the minute you actually shoot a single ray in some .sl shader, *grind*, PRMan has to do what mental ray always does.... and the comparasion suddenly isn't so much in favour of PRMan any more.

Since I am of the opinion that there exists no interesting shading that doesn't involve raytracing, I find the fact that "yes, PRMan can be faster with raytracing off" a completely academic opinion of no practical value (but of course, all speed-tests are run like that, naturally.... *sigh*). I am wholly uninterested in oldschool dinky-toys rendering in a fisher-price universe of reflection maps and reflective occlusion (a trick invented solely to "avoid tracing rays". And of course they build their reflective occlusion maps with mental ray... LOL)


Alas, that's all I have time for today.... more later.


/Z

2006-11-29

Who took my "temporal contrast"?

I've received some questions about the "temporal contrast" option and who stole it from the 3ds max 9 UI.

Here's the deal:

In mental ray 2.1 and earlier, it actually used a temporal contrast, which worked very similar to the overal adaptive sampling contrast. However, this actually yeilds suboptimal motion blur.

So mental ray 3.0 or newer actually takes a fixed number of temporal samples for each spatial sample.

However, the parameter, as exposed in the .mi file format still is "temporal contrast" and is an RGBA color. However, this color isn't actually interpreted neither as a color nor as a contrast at all!

What happens is that a number of temporal samples is calculated from this color as such:

samples = 1.o / min(temporal_contrast)

So this means a "temporal contrast" of 0.2 0.2 0.2 0.2 really only means "5 temporal samples". Nothing else. There is no "contrast" comparisions being done between temporal samples at all!

So... since mental ray does this internally, this was propagated to the max 9 UI as a temporal samples spinner, rather than the old "temporal contrast".

It most likely will be changed in the .mi file format in a future version to a "time samples" instead of "time contrast" keyword.

Hope this is clear as mud... ;)

/Z