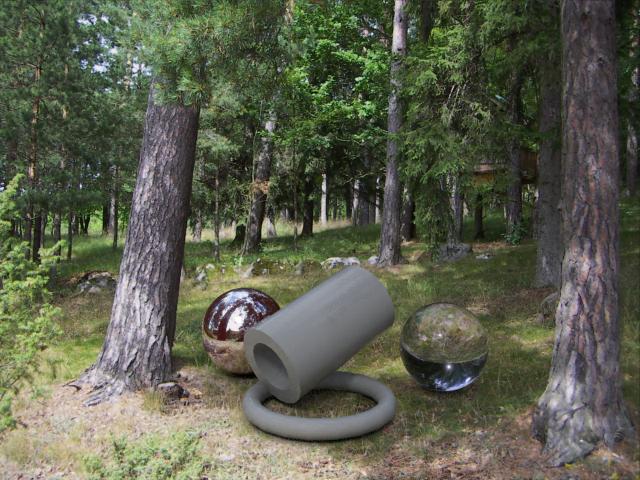
Showing posts with label Maya. Show all posts

2008-08-01

mrMaterials.com & The Floze Tutorials

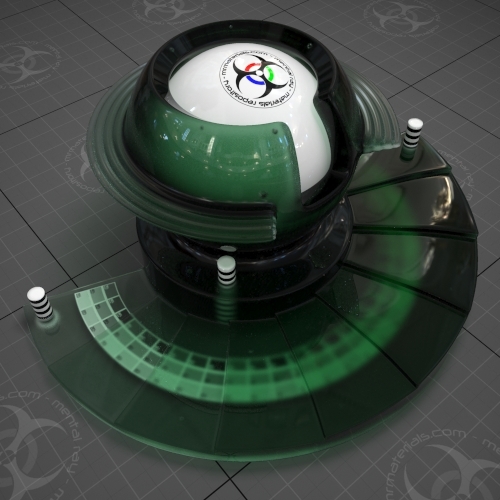
mrMaterials.com


Last week, the site mrmaterials.com opened officially to the public, so you can actually up- and download materials there as well as (like I mentioned in my last post) mymentalray.com. So don't be shy, up & download those nice mental ray materials as much as you like!


The Floze Tutorials


Florian Wild, most known as "Floze" online, has put together an outstanding set of tutorials for mental ray about rendering various types of environments. These are, in order:


Sunny Afternoon


Twilight


Moonlight


Electrical


Candle Light


Underwater


Florian has undoubtedly done a great job on these, and they are very good reading, and even though they are written for Maya, mental ray is mental ray, so the basic techniques can be transported to XSI, 3ds Max etc. just as well.

Luckily, Floze has already done the thinking for you here as well, and this is available in eBook format from www.3dTotal.com for £8.55 (which I think he is well worth).

Enjoy

Stuff


Siggraph is closing in. I plan to do a bit of "reporting" from it on twitter, (so follow me there), and I may even, if I get extra crazy, do some QiK coverage. We'll see....

...until next time - keep tracing. ;)

/Z

2008-06-27

Layer all your Love on Me, MyMentalRay, Material Libraries and.... Stuff

MyMentalRay.com


First, before I start todays post, I advise everyone to run over to the freshly updated mymentalray.com which has a brand new fresh coat of paint, an updated material library, dynamic content, and a lot of other spiffy stuff.


Take note especially at the start of the mental ray material library over there. It's not the only effort of it's kind. My pal Jeff Patton is involved with a second very similar effort known as mrmaterials.com.

Simple Layering


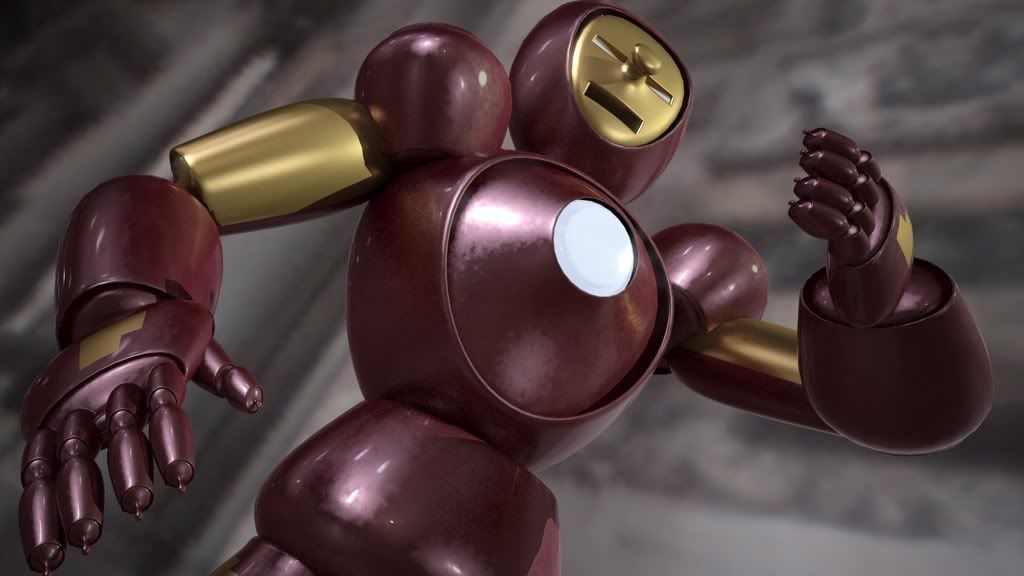
I keep getting questions about layring (probably sparked by the recent writings about Iron Man) where you want to use something like Arch&Design (mia_material) to give both a broad specular glossy highlight, and a 2nd layer of a much more shiny "clearcoat" style material.

Well, nothing is stopping you from doing exactly that. I made this Iron Man material (apologies in advance to Ben Snow, and to all you guys for my lack of modelling sKiLz :) )


This isn't high art, but is there to demonstrate the concept. In most applications like Maya and XSI, you can easily blend materials using various blending nodes. But I did this in 3ds Max, and it's a little bit more difficult in a sense. I used the 3ds Max Blend material for this.

The trick is to understand that the 3ds Max Blend doesn't just *add* two materials (that's what the Shellac does), but it interpolates between them. This is generally better, because you do not break any energy conservation laws! (Also it works with photons that way!). Shellac, while nice, makes it really easy to make nonphysical materials.

However, since you are working with Blend you will have to take this into account. Here is an example:


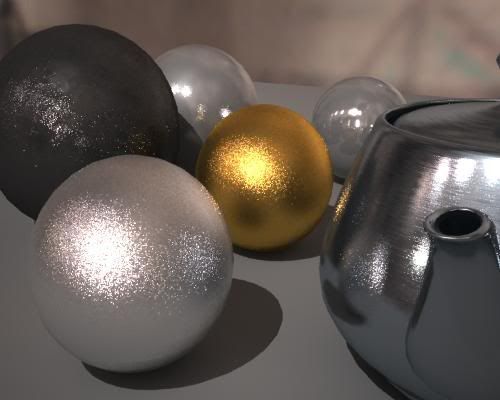
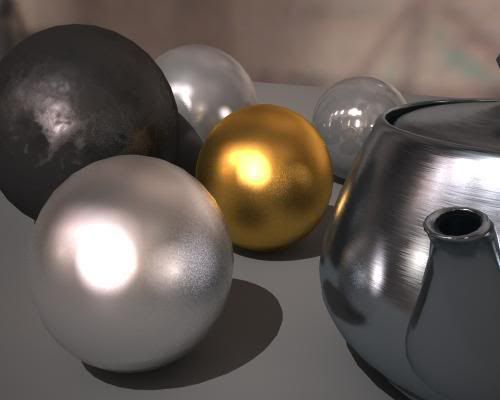
From left to right:

  • Left: A completely mirroring Arch&Design material
  • Center: A glossy Arch&Design material in "Metal" mode
  • Right: a Blend material using the above two and a Falloff in Fresnel mode as the blend map.


A couple of things to note about this:

  • The "common mistake" people do is to make one material that is a shiny material with a falloff for the clearcoat, and completely reflective (glossy) material for the "base" material, and then try to blend these two with Shellac.

    This very easily causes nonphysical reasults on edges. Instead doing a Blend between 100% reflective and the "base surface" makes sure to keep the energy in check.

  • Note that for metallic colored objects, their color does affect the color of reflection, but for dielectric objects the reflection is always white.

    You do this by having the "Metal" mode turned on for the base objects (so reflection color is taken from diffuse color) but OFF for the clearcoat (which is a dielectric). This way you get the proper "uncolored" sharp reflections on top of "colored" glossy reflections.


In this particular "Iron Man" material, I also utilized pieces of the car paint shader to get the "flakes" (although the movie version didn't really have any) in the paint. For that I only utilized a single component of car paint (flakes) and had pretty much everything else coming from Arch&Design. For this reason I did use Shellac to layer the car paint with the Arch&Design.


More advanced Layering


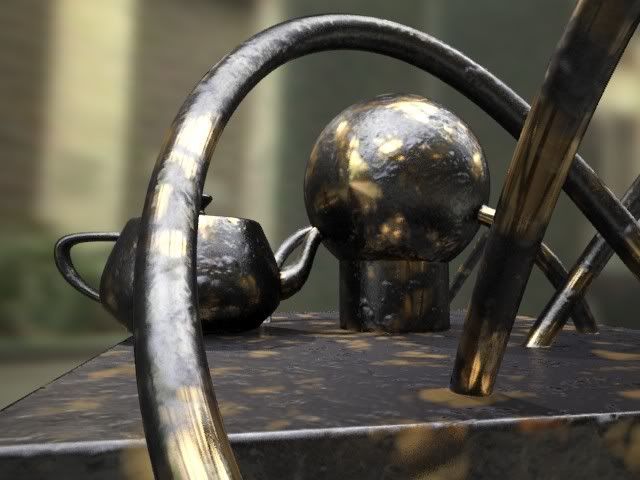
This "Blend" technique can be used in multiple layers, witness this (again apologies for my modelling skills :) )


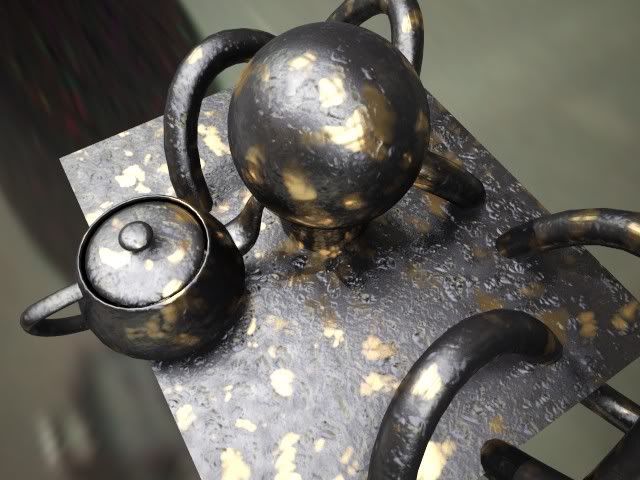
This image originated from a question I got about making "greasy brass", so I made this material (also available on mymentalray.com) which doesn't just blend two things together, but several. Without going too deep into the technique, I am blending between the metal layer, and two different "grease" layers, here with different bump maps.

The trick to keep straight in your head is to make each "layer" look as if it was only made of the given sub-material, and let the blending between the layers handle the weighting (and, unless you "know what you are doing", avoid blendings where they sum up to more than 100%. This is automatic in 3ds Max when using "Blend" but in Maya or XSI - or in 3ds Max when using "Shellac" - it's easy to run amok with the levels)


As always with metal, having something interesting to reflect (i.e. some HDRI environment or similar). But I covered that in an earlier episode (see also here about glossy materials).

...and Other Stuff(tm)


In other news:


  • On popular demand I updated the new skinplus.mi file mentioned in a previous post so it now has a special version that does displacement. See the (updated) post.

  • For those who has missed it, go over to FXGuide.com where there is lots of cool coverage of the vfx business. Also, if you aren't subscribing to CineFex, well, then you should.


Thanks for listening. As always, following me on Twitter is a great idea, especially as SIGGRAPH draws closer. I'll be Tweeting my location regularly while in L.A.

/Z

2008-05-08

SIGGRAPH 2008 talks

Phew. I just finalized the course notes for my SIGGRAPH talks.


As mentioned before, I will be holding an Autodesk masterclass with the title of "Miracles and Magic: mental ray technology in Photo-real Rendering for Production". This will - on popular demand - be a lot about gamma and linear workflow (I actually clocked the pure presentation "talky" part on this segment alone at 30 minutes, sans practical demo bit!).

Beyond the LWF/Gamma stuff, it'll talk about CG/Live Action integration, and tips for rendering flicker-free animations, and some other stuff (assuming I can get through it all in time ;) ).

Unless things change, the masterclass itself is from 1:30PM to 3:00PM on Thursday, August 14:th. There is also a "QA with all the masterclass presenters" on Wednesday, August 13:th at 9:00AM that I will also participate in. The full agenda and more info is here.

Furthermore, I will also be co-teaching a SIGGRAPH course entitle "HDRI for Artists" together with Kirt Witte (Savannah College), Hilmar Koch (ILM), Gary Davis (Autodesk) and Christian Bloch (HDRLabs).

The class is set for Monday, 8:30-12:15 in room 502A.

To make it easier to track these things, I've added a twitter feed, plus I gave this place a new, short, easy-to-remember URL:

www.mentalraytips.com


Enjoy.

/Z

2008-02-19

Why does mental ray Render (my background) Black? Undestanding the new Physical Scale settings

The most common "complaints" I get about mental ray rendering in 3ds Max 2008 is "it's washed out" and "it Renders black". The answer to the former is "you are not handling your gamma correctly", and will be thorougly covered in the future. The answer to the latter is "You are not understanding the Physical Scale" settings. Which is what we're going to talk about now.

Color and Color


Without going too deep into the physics of photometric units (we did that already) we must understand that a normal color, an RGB value, i.e. a pixel color of some sort, can, fundamentally represent one of two different things:


  • A reflectance value
  • A luminance (radiance) measurement


The "luminance" of something is simply how bright it looks. It's probably the most intuitively understandable lighting unit. Basically, you can say that when you are looking at the pixels your digital camera spit out on your computer, you are looking at pixels as individual luminance measurements, converted back to luminance variations by your screen.

I.e. a given luminance of some real world object flows in through the lens of your camera, hits the imaging surface (generally a CCD of some kind) and gets converted to some value. This value (for the moment ignoring things like transfer curves, gamma, spectral responses and whatnot) is, in principle, proportional to the luminance of the pixel.

Now "reflectance" is how much something reflects. It is often also treated in computer graphics as a "color". Your "diffuse color" is really a "diffuse reflectance". It's not really a pixel value (i.e. a "luminance") until you throw some light at it to reflect.

And herein lies the problem; traditionally, computer graphics has been very lax with treating luminance and reflectance as interchangeable properties, and it's gotten away with this because it has ignored "exposure", and instead played with light intensity. You can tell you are working with "oldschool" rendering if your lights is of intensities like "1.0" or "0.2" or something like that, in some vague, unit-less property.

So when working "oldschool" style, if you took an image (some photo of a house, for example) and applied as a "background", this image was just piped through as is, black was black, white was white, and the pixels came through as before. Piece of cake.

Also, if you took a light of intensity "1.0" that shone perpendicular on a diffuse texture map (some photo of wood, I gather) will yield exactly those pixels back in the final render.

Basically, the wood "photo" was treated as "reflectance", which was then lit with something arbitrary ("1.0") and treated on screen as luminance. The house photo, however, was treated as luminance values directly.


But here's the problem: Reflectance is inherently limited in range from 0.0 to 1.0... i.e. a surface can never reflect more than 100% of the light it receives (ignoring fluorescence, bioluminescence, or other self-emissive properties), whereas actual real-world luminance knows no such bounds.

Now consider a photograph... a real, hardcopy, printed photograph. It actually reflects the light you shine on it. You can't watch a photograph in the dark. So what a camera does is to take values that are luminances, take it through some form of exposure (using different electronic gains, chemical responses, irises to block light, and modulating the amount of time the imaging surfaces is subjected to the available luminances). Basically, what the camera does, is to take a large range (0-to-infinity, pretty much) and convert it down to a low rang (0-to-1, pretty much).

When this is printed as a hardcopy, it indeed is basically converting luminances, via exposure, into a reflectance (of the hardcopy paper). But this is just a representation. How bright (actual luminance) the "white" part of the photographic hardcopy will be depends on how much light you shine on the photograph when you view it - just like how bright (actual lumiance) the "white" part of the softcopy viewed on the computer depends on the brighness knob of the monitor, the monitors available emissive power, etc.

The funny thing with the human visual system is that it is really adaptive, and can view this image and fully understand and decode the picture even though the absolute luminance of the "white" part of the image varies like that. Our eyes are really adaptive things. Spiffy, cool things.

So, the flow of data is:

  • Actual luminance in the scene (world)
  • going through lens/film/imaging surface and is "exposed" (by the various camera attributes) and
  • becomes a low dynamic range representation on the screen, going from 0-to-1 (i.e. from 0% to 100% at whatever max brightness the monitor may have for the day).


So, now the problem.


In the oldschool world we could draw a near equivalence between the "reflectance" interpretation and the "luminance" interpretation of a color. Our "photo of wood" texture looked the same as "photo of house" background.

What if we use a physical interpretation?

What about our "photo of wood"? Well, if we ignore the detail of the absolute reflectance not necessarily being correct due to us not knowing the exposure or lighting whtn the "photo of wood" being taken, it is still a rather useful way to reperesent wood reflectance.

So, if we shine some 1000's of lux of light onto a completely white surface, and expose the camera such that this turns into a perfectly white (without over-exposure) pixel on the screen, then applying this "photo of wood" as a texture map will yeild exactly the same result as the "oldschool" method. Basically, our camera exposure simply counter-acted the absolute luminance introduced by the light intensity.

So, in short, the "photo of wood" used interpreted as "reflectance" still works fine (well, no less "fine" than before).

What about us placing our "photo of house" as the background?

Well, now things start to change... we threw some thousands of lux onto the photo, creating a luminance likely in the thousands as well.... these values "in the thousands" was then converted to a range from black-to-white by the exposure.

So what happens with our "photo of house"? Nothing has told it to be anything than a 0-to-1 range thing. Basically, if interpreted strictly as luminance values, the exposure we are using (the one converting something in the thousands to white) will covert something in the range of 0-1 to.... pitch black. It won't even be enough to wiggle the lowest bit on your graphics card.

You will see nothing. Nada. Zip. BLACKNESS!

So, assuming you interpret oldschool "0-to-1" values directly as luminance, you will (for most common exposures) not see anything.

Now this is the default behaviour of the mr Photographic Exposure control!!


This setting (pictured above) from the mr Photographic Exposure will interpret any "oldschool" value directly as a cd/m^2 measurement. And will, with most useful exposures used for most scenes, result in the value "1" representing anything from complete blackness to near-imperceptible-near-blackness.

(I admit, I've considered many a time that making this mode the default was perhaps not the best choice)

So how do we fix it


Simple. There are two routes to take:


  • Simply "know what you are doing" and take into account that you need to apply the "luminance" interpretation at certain points, and scale the values accordingly.
  • Play with the "Physical Scale" setting


Both of these methods equate to roughly the same result, but the former is a bit more "controlled". I.e. for a "background photo" you will need to boost it's intensity to be in the range of the "thousands" that may be necessary to show up for your current exposure. In the Output rollout, turn up "RGB Level" very high.

Of course, in an ideal world you would have your background photo taken at a known exposure, or where you had measured the luminance of some known surface in the photo, and you would set the scaling accordingly. Or even better, your background image is already a HDR image calibrated directly in cd/m^2.

But what of the other method?

Undersanding the 'Physical Scale' in 3ds Max


When you are using the mr Phogographic Exposure control, and you switch to the "Unitless" mode...


...one can say that this parameter now is a "scale factor" between any "oldschool" value and physical values. So you can think of it as if any non-photometric value (say, pixel values of a background image, or light intensities of non-photometric lights) were roughly multiplied by this value before being interpreted as physical values. (This, however, is a simplification; under the hood it actually does the opposite, it is the physical values that are scaled in relation to the "oldschool" values, but since the exposure control exactly "undoes" this in the opposite direction, the apparent practical result of this is that it seems to "scale" any oldschool-0-1 values)


When to use which mode


Which method to use is up to you. You may need to know a few things, though: The "cd/m^2" mode is a bit more controllable and exact. However, the "Unitless" mode is how the other Exposure controls, such as the Logarithmic, work by default. Hence, for a scene created with a logarithmic exposure, to get the same lighting balance between photometric things and "oldschool" things, you must use the unitless mode.

Furthermore, certain features of 3DS Max actually works incorrectly, indeed limiting their output to a "0-1" range. Notable here is many of the volumetric effects like fog. Hence, if the "cd/m^2 mode" is used, it blocks fog intensity to max out at "1 cd/m^2". This causes things like fog or volume light cones to appear black! That is bad.

Whereas in the "Unitless" mode, the value of "Physical Scale" basically defines how bright the "1.0" color "appears", and this gets around any limitation of the (unfortunately) clamping volume shaders.


BTW: I actually already covered this topic in an earlier post, but it seems that I needed to go into a bit more detail, since the question still arise quite often on various fora.

Hope this helps...

/Z
2007-11-05

More Hidden Gems: mia_envblur - glossy reflections of Environments

I thought initially I would title this post "Happiness is a Warm Gun", since it could have just as well have been the "black gun metal" tip, but I felt a more "searchable" name would be more useful...


Formulating The Problem


Glossy Reflections in computer graphics is always a headache, since it invariable involves multiple samples, which invariably involves grain. Interpolation helps, but interpolation isn't really working well for complex geometries, and can be "detectable" in animations (i.e. you can often "see" that something fishy is going on w. reflections, so I advice against using interpolated reflections in animations).

But, you say, I need to have my semi-glossy space robot/gunship/whatever and I need to animate it, and I have this really contrasty HDR environment it must reflect... I would need to turn up samples to crazy levels... the animation would never be finished! What can I do!?

The solution: mia_envblur


This shader is another "sort of hidden" (depending on which application you are running, it's hidden away in 3ds Max but not in Maya, and it's existence isn't really marketed heavily... ;) )

What does it do?


Well, the documentation explains this fairly clearly, but in short:

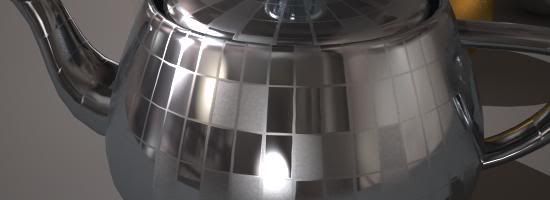
If you have some objects in a scene which largely reflects an environment map (this bit is important; mia_envblur really dosn't do anything useful for, say, an architectural interior where objects reflect other objects, it only does it's job for environment reflections) and your environment is high-contrast, you tend to get grain as a result. Witness here some spheres n' stuff reflecting the good old "Galileo's Tomb" probe from Paul Debevec:


Grusomely Grainy


This is clearly not satisfactory, the grain is very heavy, causing slow renders due to a lot of oversampling happening. We can turn up the sampling in the shaders and get something like this:


Borderline Better


This looks nicer indeed, but the render time was nearly ten times of the above! Not something you'd want to do for an extended animation. And it would still glitter and creep around. Not good.

So... enter mia_envblur. The shader is used to "wrap around" some existing environment shader, i.e. it takes some other environment shader, rasterizes it into an internal mipmap, and can perform intelligent filtered lookups in a special coordinate space which behaves very close to doing actual glossy lookups to that environment with a near-infinte amount of rays!


Soothingly Smooth!

This is much nicer looking, and the environment reflections are smooth (but object-to-object reflections still involve multi-sampling and can have some grain. A trick around that is to limit the reflection distance as mentioned in the manual).

To use mia_envblur, you must follow these steps:

  • Where your existing environment shader is connected, instead connect mia_envblur, and connect your original environment into it's environment input.
  • In your mia_material, turn on it's "single_env_sample" parameter. This is very important or you will gain neither speed nor quality (although you will get a little bit of smoothing, but not supersmoothing of the reflections)
  • Set the "resolution" high enough to resolve the details of your original environment.

As for the actual blur amount, you have two choices; Either you set a fixed amount of blur with the mia_envblur parameter Blur. But that is a bit boring... if you have different materials of different glossiness, you would need separate copies with different blur ammounts applies as environment maps to each materials... very tedious...!

Much better is to turn on the mia_material_blur parameter on!

This will drive the amount of blur from the glossiness setting of the mia_material. This works such, that mia_material "informs" the environment shader which glossiness is used for a certain environment lookup, and hence allows a single global copy of mia_envblur (applied in the global (camera) Environment slot) to follow the glossiness of multiple mia_materials, or even map-driven glossiness on a single material:


Very Visible Variable Varnishness


I can't stress enough how varying the glossiness with a map gives a nice feel of wear, tear and "fingerprintiness" of an object. And with mia_envblur you can do this without being ashamed and fear horrid render times.

Production Shaders?


Yes, mia_envblur works great together with the production shaders. Just "wrap" it around your mip_mirrorball shader, to do glossy lookups into it.


Perfect Production Partner


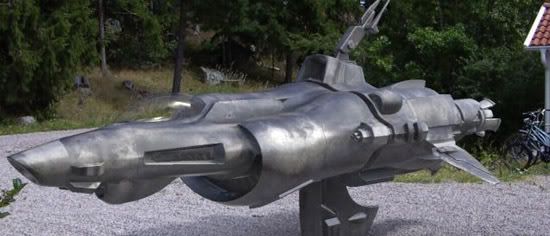
This spaceship (from TurboSquid) is mapped with a glossy reflection that is heavily varied (A whole "make a spaceship in the backyard" tutorial will probably appear later, if I find time).


Does it move?


Yes it does. Just a word of warning: be certain that the resolution parameter is set high enough to resolve all details in the environment you use. The "Gallileo" probe I use here has too many small lights in it for the default of "200" to be enough (this means the map is rasterized into a 200x200 pixel mipmap). But at 600 it works great. Also note that any non-glossy lookups into the environment map actually bypasses mia_envblur automatically, so these are looked up in the full resolution map!

See for yourself in this DivX test animation, which includes above spaceship hovering over my backyard, the above gun-metal-black battle robot (also from from TurboSquid) and some spheres, including my attempt to do a "gnarly cannon ball".

For the record, these renders also uses the photographic exposure and Lume "Glare" shader. The animations rendered at about 1 minute per frame (on a HP x6400 Quad Core)

Hope this helps your glossy-thing-renders!

/Z

2007-10-30

Production Shader Examples

So, who wants to know more about the production shaders? Raise of hands? (See the introductory post, if you missed that.)


OK, I don't have time for an extravagant essay right now, but what I did do is to put a set of examples online.

The example uses some geometry (in some cases, our friend "Robo" pictured here on the right) and shows how to use this together with the production shaders, both to introduce our geometry into various backgrounds, as well as using features like the motion blur and motion vector code.

General Overview


The Production library does a lot of things, but one of it's specialties is to help us to integrate a CG object into a photographic background, with the help of a photo of the background and a photo of a mirror ball taken at the same location in the same camera angle as the background photo. So, to play with that, we need a set of backgrounds, with matching mirror ball photos.

As luck would have it, I happen to have just that. (Amazing, innit?) ;)

These backgrounds are available in this backgrounds.zip file. Please download that and unzip before downloading any of the demos scenes (I also apologize for not having time to put Robo into any of the Maya scenes, but he was out at a party the day I made those file and didn't come home until late....)

In a hurry?


If you don't want to read, but play play play, you can go directly to this directory and you will find the files.

Examples for 3ds Max 2008


The 3ds Max demo scenes are sort of "all in one" demos, demonstrating a scene using the mip_matteshadow, mip_rayswitch_environment, mip_cameramap and mip_mirrorball to put a CG object into a real background as described in the PDF docs.


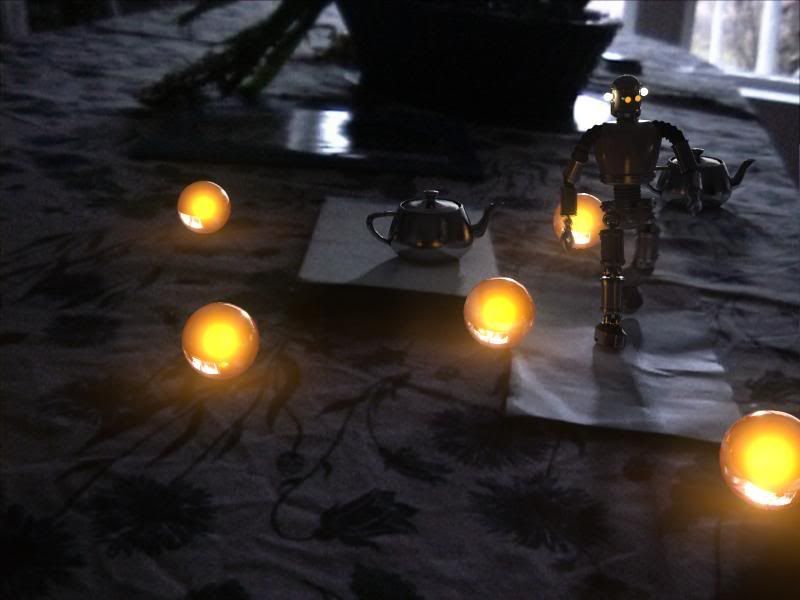
The file robot-1.max puts Robo in my back yard, robot-2.max puts him on my dining room table, robot-3.max on a window ledge, robot-4.max out in a gravel pit (how absolutely charming place to hang out) and finally robot-5.max on my dining room table but at night, and some alien globules has landed...


They all work pretty much the same, i.e. the same settings only swapping in different backgrounds and mirror ball photos from the backgrounds.zip file.

The exception is the file robot-4-alpha.max which demonstrates how to do the same as robot-4.max does, but set up for external compositing (see more details below in the Maya section).


Examples for Maya 2008


The examples for Maya are more "single task" examples, and demonstrates one thing at a time.

mip_matteshadow1.ma and mip_matteshadow2.ma both demonstrate how to put a set of CG objects into a real background, using the exact same techniques as for 3ds Max above:


The file mip_matteshadow2b.ma demonstrate the same scene as mip_matteshadow2 but set up for external compositing (what is called "Best of Both Worlds" in the manual).

To recap from the manual briefly: In the normal mode (when you composite directly in the rendering and get a final picture including the background right out of the renderer, you use mip_cameramap in the background slot of your mip_matteshadow material, and in your global environment (in the Camera in Maya, in the "Environment" dialog in 3ds Max) you put in a mip_rayswitch_environment, which is being fed the same mip_cameramap into it's background slot, but into it's environment slot it is being fed a mip_mirrorball.

To do the "Best of Both Worlds" mode (to get proper alpha for external compositing, and not see the background photo in the rendering - but yet see its effects, its bounce light, its lighting, its reflections, etc. - one need to do a couple of changes from the above setup:


  • In the global Environment should still be a mip_rayswitch_environment as before, the only difference is that instead of putting mip_cameramap into it's background slot, you put transparent black (0 0 0 0).

    The trick in Maya is that you cannot put an alpha value into a color slot. We can cheat this by using the mib_color_alpha from the base shaders, and set its multiplier to 0.0.

  • In the background slot of your mip_matteshadow you used to have a mip_cameramap with your background. What you do instead, is to put in another mip_rayswitch_environment, and into it's environment slot (important, yes, the environment and NOT the background!) you put back the mip_cameramap with your background photo, and in it's background slot you again put transparent black (using same trick as above).


Having done this (as is already is set up in the mip_matteshadow2b.ma example) you will get this rendering:


This image contains all the reflections of the forest, the bounce light from the forest, the reflection of the environment from the mirror ball... but doesn't actually contain the background itself.

However, it has an alpha channel that looks like this...


...which as you see contains all the shadows. So compositing this image directly on top of the background in a compositing application, will give you the same result as the full image above, except with greater control of color balance etc. in post.

Maya in Motion


There is three further example files for Maya:

mip_motionblur.ma, which demonstrates the motion blur, and mip_motionvector.ma and mip_motionvector2.ma who both demonstrate how to output motion vectors.


I know these are rudimentary examples, but the day only has 48 hours... ;)

To quote the Governator: "I'll be bak".

/Z
Making Better Metal with mia_material

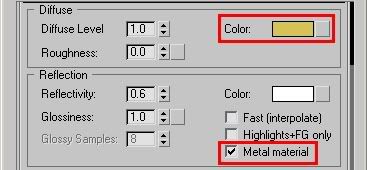
When using the Arch&Design (mia_material) in the various products, the manual mentions that to make metal, one should enable the "refl_is_metal" switch (shown here from the 3ds Max UI, but it's available in all products):


Metal Mode


When one does so, the color of the metal comes from the diffuse color swatch. However, most people stop there, and get a very dull looking material, and wonder "what wen't wrong?".

Well, not reading the rest of the manual is what went wrong ;)

Just kidding. Anyway, just turning on the "metal" mode doesn't make it look magically like metal. It looks more metal-ish but there is one more thing to do, take care of the BRDF curve.

When metal mode is on, the reflectivity (and the BRDF curve) drives the balance between traditional "diffuse" shading and reflective "metallic" shading. So if your reflectivity is zero, or you are at an angle where the BRDF curve is very low, you will be seeing mostly plain old diffuse shading, i.e. not very "metal" looking.

So what needs to be done is to pump up the Reflectivity value (probably to 1.0), and modify the BRDF curve to contain more reflectivity.

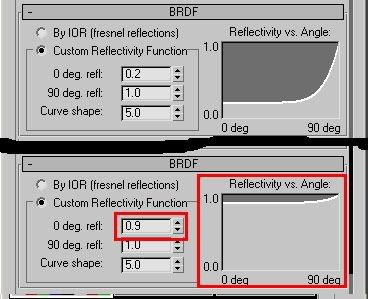
The default BRDF curve only contains a 0 degree reflectivity of 0.2, which isn't really very "metallic looking". One could change this to a higher value like so: (UI from 3ds Max shown, but exists in all products):


Making Metal More Metallic


This works pretty nicely, and most metals can be done this way. But still, it may look a tad "off" in how the reflectivity depends on angle.

Well, then we try the fresnel mode.

"What" I hear you yell, "Fresnel" is for dielectrics... transparent stuff... like water, glass and such. It is based on the Index Of Refraction. Metals aren't transparent, they can't refract stuff! O'le Zap's gone completely bonkers now!

Well... actually... no. Metals are indeed not refractive, and are indeed not dielectrics (meaning, electrical insulators). They are Conductors, and for some baroque reason these are also considered to have an "Index of Refraction".

Now, don't ask me how on earth someone came up with the idea of refractive metals or how this is actually calculated... I didn't write the laws of Physics (I just abuse them) so just trust me it's there.... and these values are high. Not your average "1.3" ish like for water, but values like "25" or "50".

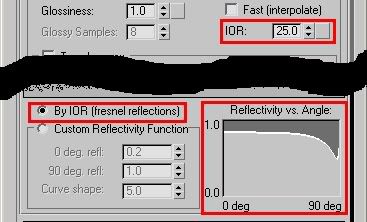
So, if you turn on the Fresnel reflection mode and put in an IOR of 50 you get something like this (Again UI from 3ds Max coz it has the neat curve):


Mysterious Metal Magic


As you see from the quirky curve, the angular dependency of the metallic reflection is... odd. But when rendering this, the metal just looks a tad more... well... metallic:

Gold in the Sun

The above is a gold material under Sun&Sky lighting. It looks "ok", but not great.. why is that? Well, our visual perception of metals come largely from the reflections. While a totally empty sky is "ok" as reflection, it's not more than just "ok"... it looks dull. (But a photo of metal in a completely cloudless desert would look about as dull).

Lets try with reflecting the good o'le "Kitchen.hdr" environment:

Gold in the Kitchen

There, exactly the same material, only reflecting something "interesting". (And yes, a tad of Glare on top, and using the Photographic exposure... so sue me ;) )

Hope this helps in the quest for More Metallic Metals.

/Z
2007-10-26

Production Shaders: "Hidden Treasures" of 2008

May I present to you, the "production" shader library.


What? Where? Production shaders?
Well, here's the story:

The Hidden Shaders


If you have installed 3ds Max or Maya 2008, you will have obtained mental ray 3.6, and with mental ray 3.6 comes the production shader library.

However, in neither of Max or Maya are these shaders exposed by default to the end user. They are hidden, and therefore "unsupported".

Still, they are there, and they can be used. But to do so, one must first "unhide" the shaders.

Why "hidden"


Simple matter of resources of Quality Assurance at Autodesk. The shaders has not gone through enough torture - yet - to be signed off by QA as "officially supported". But that's where you, my adventurous mental ray addict, come in! Consider this an extremely public beta, if you will....

How do I "unhide" them?


Unhide instructions for 3ds Max 2008 are here

Unhide instructions for Maya 2008 are here

What are they


The production shader library is a set of tools, some simple, some complex, to aid in doing production rendering, i.e. in a visual effects context.

There are two basic categories of shaders:

Simple
First we have the simple utilities like applying a gamma to a color, or giving different results for different "ray types" (reflection rays, transparency rays etc.). These shaders are very simple, and you probably have found similar shaders online before. These shaders are not better than those other shaders that do the same thing, they are simply a standard set that now ship with all products. I.e. "mip_rayswitch" isn't terribly different to Control Studio's "ctrl_rays", but you don't have to install anything to use it.

Advanced
Then we have the more complex shaders, such as the 2.5d motion blur shader, or the matte/shadow/reflection system used to cast shadows (and reflections) off of a stand-in object in your scene, for integrating CG objects into a background plate.

A lot of examples of the mip_matteshadow and other production shaders are available as a small demo movie constructed for siggraph, it's available as YouTube as well as WMV, QuickTime and DivX versions.


What do they do?


The main intent is to simplify the workflow of compositing CG objects into background plates, and other visual-effects related tasks that one may run in to on a daily basis.

In some cases they exist to give a simple workflow to a simple thing. For example, the mip_cameramap is a simple camera mapping shader that simply projects back an image from the render camera (and only that camera) "into" the scene 3-dimensionally (unlike, say, mib_lookup_background, Max's "Screen" mapping, or similar).

There are more complex "camera projection" shaders out there both for Maya and Max that can do similar jobs, but at a slightly higher effort. Again, the logic here is to provide the simple tool that can do the job, and if you need the more advanced feature, use the more advanced feature.

Similarily, the mip_mirrorball shader is for a simple unwrap of a mirror ball into an environment map when taken from the same camera angle as the background plate. For anything more advanced you would probably have to unwrap the mirror ball image in some unwrapping software and apply as a spherical map... or maybe you are a high-end user that uses SpherOn cameras and don't even use mirror balls... then ignore this shader, use your more powerful tools.


Mark my words, I will be posting quite a lot on the topic in the months to come, but meanwhile you can read the PDF documentation. In Max, the names of the shaders will appear slightly different than in the manual, but you can figure that our rather quickly, I hope.

That's all I have time for for for now:

Stay tuned to future blog posts on the subject.

/Z
2007-10-14

Yer in a "Heap" of trouble now: Avoiding random crashes in Maya/Max due to running out of Windows resources!


Note; This tip has nothing to do with mental ray at all, but since the issue I describe tend to manifest on Maya when opening the mental ray control panel (due to the sheer number of tiny windows w. subwindows) I mention it here.


Have you ever run, for example, Maya (on Windows XP or earlier - Vista works better here) with a ton of other programs running, and tried to open a particularily complex AE template for some shader, to find the application go "plop" and disappear?

While there are any number of probable causes, I was debugging a particular case and actually found the cause, and it was sometihng I never really suspected, and is pretty non-obvious. And doesn't have anything whatsoever to do with mental ray, as I said above.

So what's up?


Back in the day of 16 bit Windows 3.0, running out of "window handles" (each window on screen has a "handle", like an identifier, used by the operating system to keep track of it) was extremely common, and every Windows user recognized the symptoms... windows wouldn't open, or buttons/texts would be missing from dialogs, or windows opened as only borders, or a strange "placeholder text version" of dialogs popped up.... whatever.

You'd think that a "modern" operating system wouldn't have a limit on the number of windows it could have opened, right? With multipled gigabytes of RAM, this shouldn't be an issue... right?

Well... think again. ;)

First of all the number of possible handles is apparently - still - limited to a 16 bit number (that's 65536 possible handles). But the real limit doesn't lie there, coz that's plenty. The real limit lies in the fact that each "window handle" also implies a memory allocation of a special data structure, that lives in a special memory area called the "desktop heap". And this memory area is small. As a matter of fact, by default, on XP (32 AND 64 bits) ... it's 3 megabytes!!!! Thankfully, on Vista it's larger, so Vista users do not need to do anything (except cry over all the other issues with Vista.... but that's for another blog day...)

Practically, this means that at around a few thousand windows (or other handles), things start failing.

Now, the user interface in Max, Maya and XSI are "windowed" UI's. This means that each control in each dialog is considered a "window" (from the point of view of the operating system). And sub-dialogs, little rollouts, etc. are all subwindows, with controls sub-sub-windows, and buttons can be sub-sub-sub-sub-windows, etc.

Anyone who has seen a compelex Max dialog box or Maya UI, and consider that counting every single little box, control, and thing, you'll find that that's a lot of windows. Maya easily consumes a couple of thousand handles all on it's own. (You can see this by telling your task managers "processes" tab to display the "GDI OBJECTS" column)

(Incidentally, this issue is known by Microsoft, to the extent that they try to write their software "windowless", i.e. when you run, say, Internet Exploder, each little thing on the webpage is not a separate window from the OS's point of view, precicely because of this problem!)

All is lost! The Sky Is Falling! Or?


Not at all.

See, the cool thing is that you can set up the size of the "desktop heap" by fiddling with the registry.

However, there are two things to consider when doing this, one fairly benign, and one less so.

The benign issue is that the "desktop heap" actually comes out of a larger memory area called the "Session View" (don't you just love these names?). And the size of the "Session View" is also limited (to 48Mb by default). Which is again adjustable, but that in turn lives in Kernel address space, which also is limited... to another, larger, value. And so on. You get the idea.

So the point is, you can increase the "desktop heap" size by editing the registry, but you can't just do it willy nilly and put in any old value, because you will get other problems, of running out of "Session View" space.

What I did was to up it from 3Mb to 4Mb, and the problems I had pretty much went away immediately.

The second, less benign issue, is that this is a really hairy registry location, and a horribly convoluted registry key, which actually contains a long string of some 200 characters where you have to change one thing in the middle, and the problem is the fact that doint it wrong can turn your PC into a brick.

Let me repeat that: Doing the registry edit INCORRECTLY CAN TURN YOUR PC INTO A BRICK. A DOORSTOP. A BOAT ANCHOR. MKAY!!??

So proceed with caution!

So what do I do?


Well, first of all, be aware of the above. I will take no responsibility for you turning your machine to scrap metal by a clumsy registry edit. Really. Proceed at your own risk, your own peril, and totally on your own responsibility. If you work at a studio, and the machine is not your own, talk to the TD or machine responsible person, point him to this webpage, and let him do it.

Okay?

Made that clear?

If things blow up, do not come crying to me. I warned you. Ok? Good.


The registry key in question is (and if you don't know how to edit the registry, you probably shouldn't be trying this...):


HKEY_LOCAL_MACHINE\System\CurrentControlSet\Control\Session Manager\SubSystems\Windows


The default value of this key is something like this


%SystemRoot%\system32\csrss.exe ObjectDirectory=\Windows
SharedSection=1024,3072,512 Windows=On SubSystemType=Windows
ServerDll=basesrv,1 ServerDll=winsrv:UserServerDllInitialization,3
ServerDll=winsrv:ConServerDllInitialization,2 ProfileControl=Off
MaxRequestThreads=16


...except it's all in one gargantuan long line, requiring you to scroll horizontally. See that "SharedSection" thing in there? After it it says "1024,3072,512"? Well, the 3072 in the middle, that's the "3 megabytes" we are talking about. 4 megabytes is 4 * 1024, i.e. 4096. So what we want to do is change "3072" to "4096".

Having done that, and rebooted, you should be gold.

More information about the desktop heap can be found here, or using, well, Google.

/Z

2007-10-12

Maya: No Alpha channel on mia_material(_x)?

This must rank as the "most frequently asked question ever". (And consequently, the worst use of Google ever, apparently, since CGTalk alone has more threads on the topic than you can shake a stick at).

The problem: You render stuff in Maya, using mia_material(_x) - or any other "mental ray" shader - but you find that those pixels containing that shader has no alpha. What gives?

The reality is that Maya has a very peculiar notion of Alpha... because the Maya software renderer actually has true three-colored "transparency", so transparency gets passed around separately in the most... odd... ways ;)

Hence, to get the Maya system to "understand" a standard shader that uses alpha, you need to check this here little checkbox:


Then, life should be more fun again!

/Z

2007-10-01

Maya's default shadow settings

Clickeroo

No too long ago I wrote about Maya and shadows.

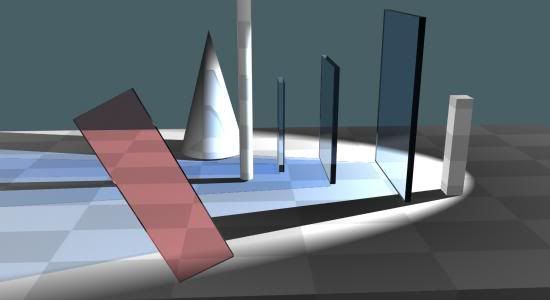
There is another "issue" related to Maya and shadows; the default shadow trace depth on Maya is 1 (called "Ray Depth Limit" in the lights "Raytrace Shadows" panel). This means that even after one bounce (like a reflection in a mirror, or behind a pane of glass) you suddenly do not have shadows any more! This can hugely impact any quality interior GI render, and you can get all sorts of issues caused by this.

NOTE: A common misconception is that the Maya "Ray Depth Limit" on the ray traced shadows is how many surfaces the shadow rays penetrate. This is not so!.

This image is rendered with the "Ray Depth Limit" of 1:


Notice how the light still gladly penetrates 3 blue glass blocks (6 surfaces in total) and still generates a shadow? Yet when viewed through the single red glass block, the view as seen trough it suddenly is completely shadow-less!

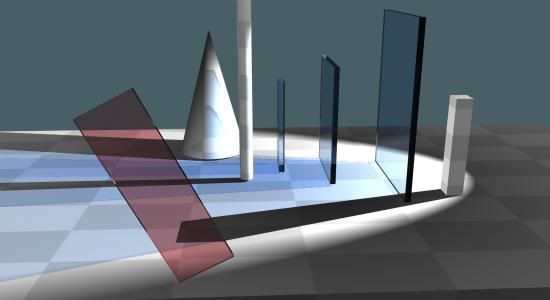
Whereas if we turn up the "Ray Depth Limit" to 3, and the "Shadows" depth to 3 in the mental ray render globals (yes, you must change both!) you get:


Another demonstration of this can be found here

So, in conclusion

Make sure to take a look at Maya's shadow settings, making sure to look at

- shadow trace depth (note this must be set on the light (defaults to 1) as well as in the mental ray render globals (defaults to 2))

- "Low" area light samples (defaults to 2x2) and the "High Sample Limit". However the "High Sample Limit" defaults to 0, which turns OFF the "low area light sampling" mode. This is "good" quality wise (you never actually get the "low area sampling") it precludes a particular mia_material(_x) optimization (it tries to control this from the material, driven by importance, but it cannot do so if it is set to 0). I suggest you turn it up to 4. You can generally keep your "low" sampling at 2x2 when you are using the mia_material, but when using other materials, this may be something to watch out for, since they will strictly adhere to the "depth" setting rather than the relative ray importance, like mia_material(_x) does it.

/Z

2007-09-10

Sitting in the Shade with Maya... mia_material shadow shading.


Hello guys and gals.

Just a quick heads-up.

It's come to my attention that there is a performance issue with the "segment" shadow mode and the mia_material shadow shader. It's fine for transparent objects (i.e. it does the job it's "supposed to do").

However, for opaque objects, it is actually doing a bunch of unnecessary work, especially in "Segment" shadow mode - which is the default mode in Maya.

The workaround is very simple; don't use the shadow shader for opaque objects.

Normally, you would use the same instance of mia_material in your surface, shadow and photon slots. Well, if your material is opaque, simply don't put it in the shadow slot. This could gain you some performance.

/Z

(In Max this isn't an issue, since first of all, "segment" shadow mode isn't the default, and secondly, the UI frontend actually does the above already, i.e. it doesn't assign the shadow shader at all to opaque objects.)

2007-08-27

Doing BIG renders in Maya

Since I wrote the below post "Doing BIG renders in max 9" I have been drowned in the question "so how about Maya"?

Well, this is most easily done from your command line, i.e. your windows command line.

Basically, if you want to render the scene "lion.mb" to a 5000x3000 pixel image, you can do that in tiles or stripes or whatever, from the command line. For example you can split it into five 1000x3000 pixel renders that you save in "c:\foo" directory, like so:

render -x 5000 -y 3000 -reg 0 999 0 3000 -rd c:\foo -im part1 lion.mb
render -x 5000 -y 3000 -reg 1000 1999 0 3000 -rd c:\foo -im part2 lion.mb
render -x 5000 -y 3000 -reg 2000 2999 0 3000 -rd c:\foo -im part3 lion.mb
render -x 5000 -y 3000 -reg 3000 3999 0 3000 -rd c:\foo -im part4 lion.mb
render -x 5000 -y 3000 -reg 4000 4999 0 3000 -rd c:\foo -im part5 lion.mb


Again, remember, if you are doing FG, to avoid seams between the parts, follow the procedure outlined in the original post, i.e. in brief, speaking "Maya language"

  • Reduce Resolution
  • Render to finalgather file by setting Rebuild to "On" and specify a filename
  • Set the finalgather file to "Freeze"
  • Do the actual renders

/Z