I have a question about preference, since this seems to differ between people I talk to... and I'm starting to be curious as what is actually most "widespread":
The question: For a glossy reflection shader, what parameter do you want to define how "glossy" reflectoins are... and what "direction" should it work?
Clearly the name "glossiness" (that mia_material) uses is suboptimal, because some people associate "more glossiness" with "more blurry reflections" whereas others associate "more glossiness" with "more polished i.e. closer to a mirror".
So there are a few choices, either go with "shininess" which is easier to understand that a "higher" value is "more like a mirror". However, Physically Based Shading is talking increasingly about "roughness" as the value (the MILA shaders use that, for example). Unfortunatly, the "roughness" as defined in physics goes from "zero to infinity" in a very visually "nonlinear" way, and hence is very hard to map a texture to. In the other end of the spectrum we have "specular exponents" like Phong, that also go from "zero to infinity" but the other way around.....
So .... I just want to hear from you, the user community, what you think is preferred.
/Z
/Z
Showing posts with label glossy reflections. Show all posts
Showing posts with label glossy reflections. Show all posts
2013-08-19


2008-11-21
Singapore Sling: SIGGRAPH ASIA 2008
In December, I am flying to Singapore to attend SIGGRAPH ASIA.

Singapore. I think.
This will really be my first visit to this corner of the world, so it will be interesting. Assuming the current planning remains, you can most likely find me around our mental images corner of the NVidia booth, as well as doing mental ray demos in the Autodesk booth. I'll be tweeting as well, as usual.
Among other things, one thing I will be doing at SIG' ASIA is to do a re-run of my masterclass from SIGGRAPH 2008 in Los Angeles, entitled "Miracles and Magic".
It was clear I had tried to cram way too much stuff to fit in the 1.5 hours I had; I had to skip every single live demo, and leapfrog little gems to just to get through it all. But I did get through it all, at a breakneck pace.
The Audience looked somewhat like this:
So... the idea here is to re-do pretty much the same masterclass, but as a 3 hour version. This would give us a more ... relaxed... pace, and the demo bits would actually fit!
So, to be totally clear. If you were at my Autodesk masterclass (not the "SIGGRAPH Course" on "HDRI for Artists") held at the Westin Bonaventure in Los Angeles, you already saw this, but very ... quickly. :)
So if you weren't in L.A, and are interested in the same topics, feel free to attend. The blurb for the class reads as follows:
For more information about attending the Autodesk Master Classes, go here.
/Z
Singapore. I think.
This will really be my first visit to this corner of the world, so it will be interesting. Assuming the current planning remains, you can most likely find me around our mental images corner of the NVidia booth, as well as doing mental ray demos in the Autodesk booth. I'll be tweeting as well, as usual.
Among other things, one thing I will be doing at SIG' ASIA is to do a re-run of my masterclass from SIGGRAPH 2008 in Los Angeles, entitled "Miracles and Magic".
It was clear I had tried to cram way too much stuff to fit in the 1.5 hours I had; I had to skip every single live demo, and leapfrog little gems to just to get through it all. But I did get through it all, at a breakneck pace.
The Audience looked somewhat like this:
So... the idea here is to re-do pretty much the same masterclass, but as a 3 hour version. This would give us a more ... relaxed... pace, and the demo bits would actually fit!
So, to be totally clear. If you were at my Autodesk masterclass (not the "SIGGRAPH Course" on "HDRI for Artists") held at the Westin Bonaventure in Los Angeles, you already saw this, but very ... quickly. :)
So if you weren't in L.A, and are interested in the same topics, feel free to attend. The blurb for the class reads as follows:
- The course will focus on photo-realistic rendering in mental ray in the context of visual effects, as well as for product and architectural visualization. The session will open with a quick introduction to photometric concepts followed by a practical guide to a linear workflow and why proper gamma correction is imperative. It will then move on to efficient techniques for achieving highly realistic results when combining CG and live action by combining existing tools together (e.g. the architectural and production shader libraries), techniques for rendering flicker-free animations with Final Gathering, and tips for conserving memory.
For more information about attending the Autodesk Master Classes, go here.
/Z
2008-08-01
mrMaterials.com & The Floze Tutorials
mrMaterials.com
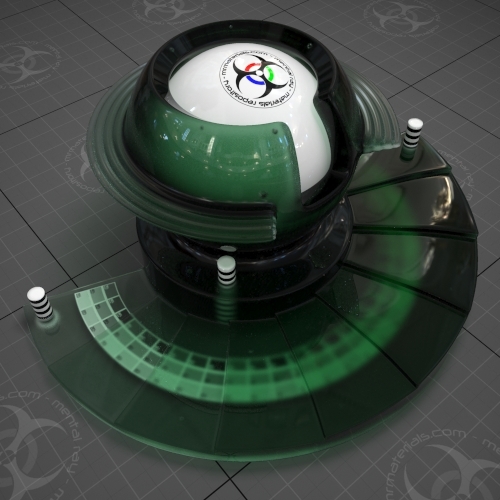
Last week, the site mrmaterials.com opened officially to the public, so you can actually up- and download materials there as well as (like I mentioned in my last post) mymentalray.com. So don't be shy, up & download those nice mental ray materials as much as you like!
The Floze Tutorials
Florian Wild, most known as "Floze" online, has put together an outstanding set of tutorials for mental ray about rendering various types of environments. These are, in order:

Sunny Afternoon


Florian has undoubtedly done a great job on these, and they are very good reading, and even though they are written for Maya, mental ray is mental ray, so the basic techniques can be transported to XSI, 3ds Max etc. just as well.
Luckily, Floze has already done the thinking for you here as well, and this is available in eBook format from www.3dTotal.com for £8.55 (which I think he is well worth).
Enjoy
Stuff
Siggraph is closing in. I plan to do a bit of "reporting" from it on twitter, (so follow me there), and I may even, if I get extra crazy, do some QiK coverage. We'll see....
...until next time - keep tracing. ;)
/Z
2008-06-27
Layer all your Love on Me, MyMentalRay, Material Libraries and.... Stuff
MyMentalRay.com
First, before I start todays post, I advise everyone to run over to the freshly updated mymentalray.com which has a brand new fresh coat of paint, an updated material library, dynamic content, and a lot of other spiffy stuff.

Take note especially at the start of the mental ray material library over there. It's not the only effort of it's kind. My pal Jeff Patton is involved with a second very similar effort known as mrmaterials.com.
Simple Layering
I keep getting questions about layring (probably sparked by the recent writings about Iron Man) where you want to use something like Arch&Design (mia_material) to give both a broad specular glossy highlight, and a 2nd layer of a much more shiny "clearcoat" style material.
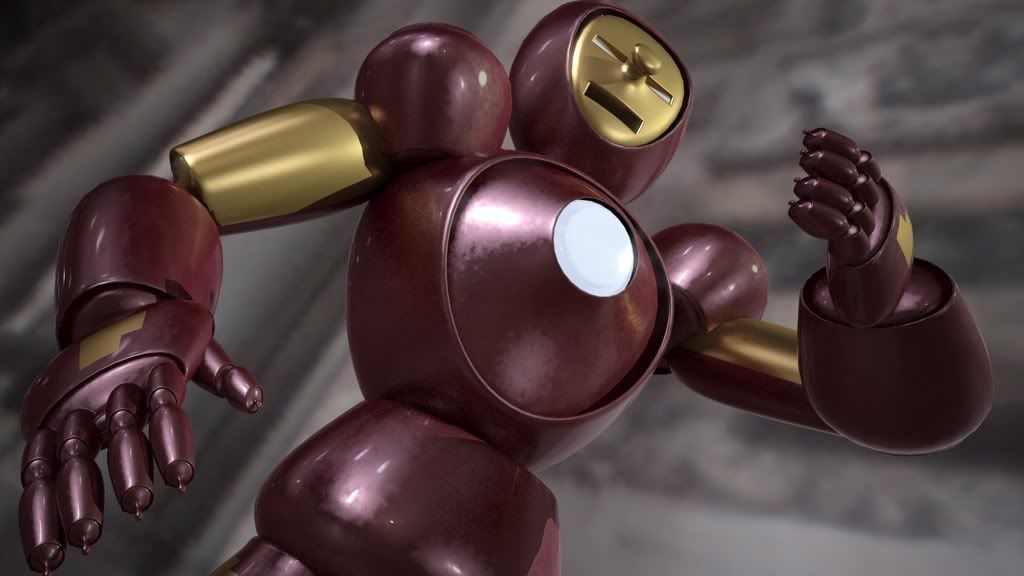
Well, nothing is stopping you from doing exactly that. I made this Iron Man material (apologies in advance to Ben Snow, and to all you guys for my lack of modelling sKiLz :) )

This isn't high art, but is there to demonstrate the concept. In most applications like Maya and XSI, you can easily blend materials using various blending nodes. But I did this in 3ds Max, and it's a little bit more difficult in a sense. I used the 3ds Max Blend material for this.
The trick is to understand that the 3ds Max Blend doesn't just *add* two materials (that's what the Shellac does), but it interpolates between them. This is generally better, because you do not break any energy conservation laws! (Also it works with photons that way!). Shellac, while nice, makes it really easy to make nonphysical materials.
However, since you are working with Blend you will have to take this into account. Here is an example:
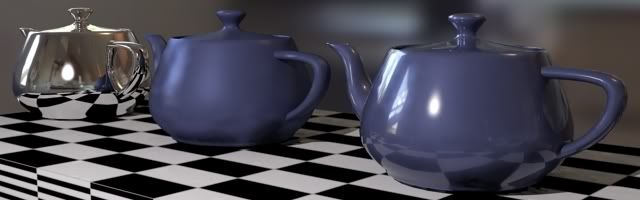
From left to right:
- Left: A completely mirroring Arch&Design material
- Center: A glossy Arch&Design material in "Metal" mode
- Right: a Blend material using the above two and a Falloff in Fresnel mode as the blend map.
A couple of things to note about this:
- The "common mistake" people do is to make one material that is a shiny material with a falloff for the clearcoat, and completely reflective (glossy) material for the "base" material, and then try to blend these two with Shellac.
This very easily causes nonphysical reasults on edges. Instead doing a Blend between 100% reflective and the "base surface" makes sure to keep the energy in check. - Note that for metallic colored objects, their color does affect the color of reflection, but for dielectric objects the reflection is always white.
You do this by having the "Metal" mode turned on for the base objects (so reflection color is taken from diffuse color) but OFF for the clearcoat (which is a dielectric). This way you get the proper "uncolored" sharp reflections on top of "colored" glossy reflections.
In this particular "Iron Man" material, I also utilized pieces of the car paint shader to get the "flakes" (although the movie version didn't really have any) in the paint. For that I only utilized a single component of car paint (flakes) and had pretty much everything else coming from Arch&Design. For this reason I did use Shellac to layer the car paint with the Arch&Design.
More advanced Layering
This "Blend" technique can be used in multiple layers, witness this (again apologies for my modelling skills :) )
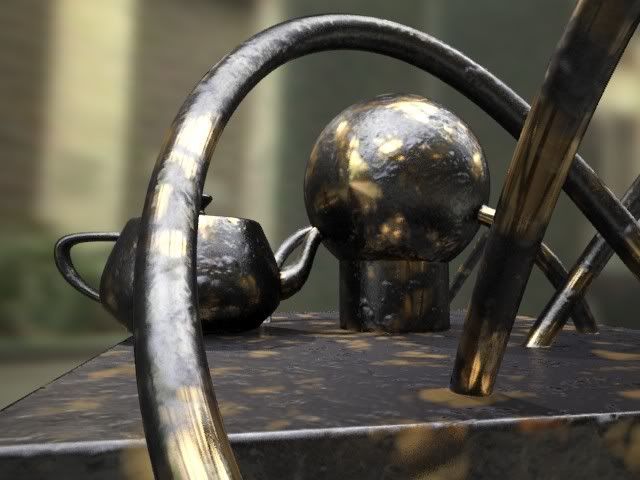
This image originated from a question I got about making "greasy brass", so I made this material (also available on mymentalray.com) which doesn't just blend two things together, but several. Without going too deep into the technique, I am blending between the metal layer, and two different "grease" layers, here with different bump maps.
The trick to keep straight in your head is to make each "layer" look as if it was only made of the given sub-material, and let the blending between the layers handle the weighting (and, unless you "know what you are doing", avoid blendings where they sum up to more than 100%. This is automatic in 3ds Max when using "Blend" but in Maya or XSI - or in 3ds Max when using "Shellac" - it's easy to run amok with the levels)
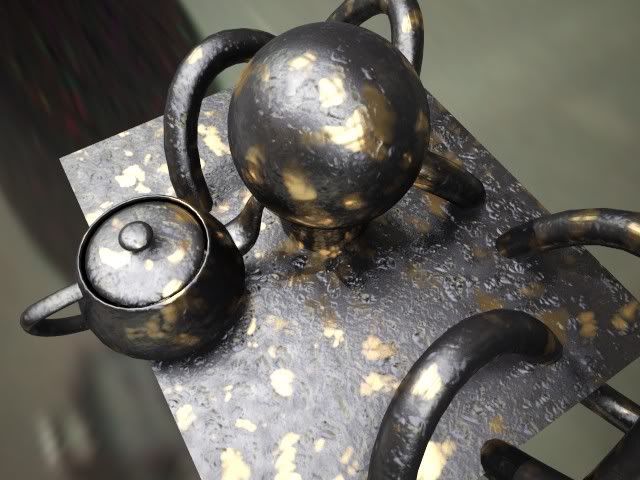
As always with metal, having something interesting to reflect (i.e. some HDRI environment or similar). But I covered that in an earlier episode (see also here about glossy materials).
...and Other Stuff(tm)
In other news:
- On popular demand I updated the new skinplus.mi file mentioned in a previous post so it now has a special version that does displacement. See the (updated) post.
- For those who has missed it, go over to FXGuide.com where there is lots of cool coverage of the vfx business. Also, if you aren't subscribing to CineFex, well, then you should.
Thanks for listening. As always, following me on Twitter is a great idea, especially as SIGGRAPH draws closer. I'll be Tweeting my location regularly while in L.A.
/Z
2007-11-05
More Hidden Gems: mia_envblur - glossy reflections of Environments
I thought initially I would title this post "Happiness is a Warm Gun", since it could have just as well have been the "black gun metal" tip, but I felt a more "searchable" name would be more useful...

Glossy Reflections in computer graphics is always a headache, since it invariable involves multiple samples, which invariably involves grain. Interpolation helps, but interpolation isn't really working well for complex geometries, and can be "detectable" in animations (i.e. you can often "see" that something fishy is going on w. reflections, so I advice against using interpolated reflections in animations).
But, you say, I need to have my semi-glossy space robot/gunship/whatever and I need to animate it, and I have this really contrasty HDR environment it must reflect... I would need to turn up samples to crazy levels... the animation would never be finished! What can I do!?
This shader is another "sort of hidden" (depending on which application you are running, it's hidden away in 3ds Max but not in Maya, and it's existence isn't really marketed heavily... ;) )
Well, the documentation explains this fairly clearly, but in short:
If you have some objects in a scene which largely reflects an environment map (this bit is important; mia_envblur really dosn't do anything useful for, say, an architectural interior where objects reflect other objects, it only does it's job for environment reflections) and your environment is high-contrast, you tend to get grain as a result. Witness here some spheres n' stuff reflecting the good old "Galileo's Tomb" probe from Paul Debevec:
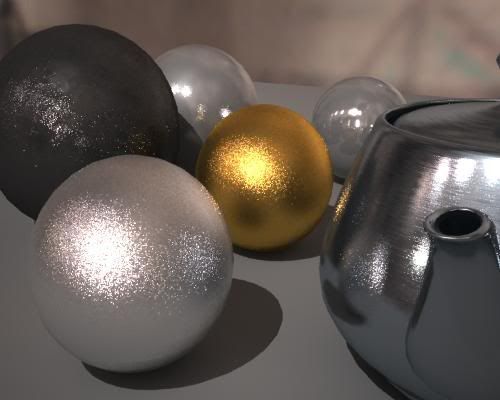
Grusomely Grainy
This is clearly not satisfactory, the grain is very heavy, causing slow renders due to a lot of oversampling happening. We can turn up the sampling in the shaders and get something like this:
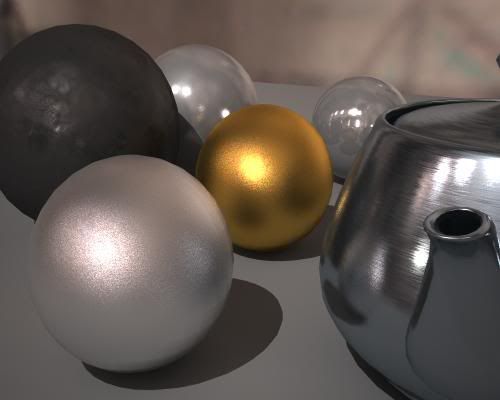
Borderline Better
This looks nicer indeed, but the render time was nearly ten times of the above! Not something you'd want to do for an extended animation. And it would still glitter and creep around. Not good.
So... enter mia_envblur. The shader is used to "wrap around" some existing environment shader, i.e. it takes some other environment shader, rasterizes it into an internal mipmap, and can perform intelligent filtered lookups in a special coordinate space which behaves very close to doing actual glossy lookups to that environment with a near-infinte amount of rays!
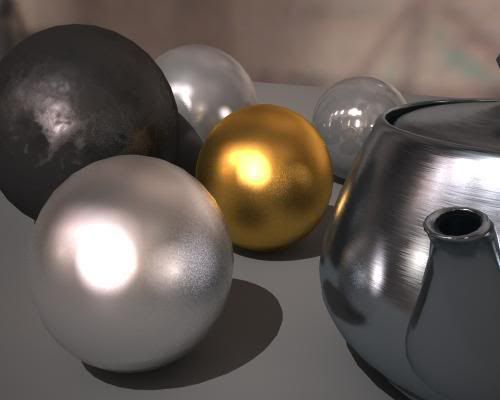
Soothingly Smooth!
This is much nicer looking, and the environment reflections are smooth (but object-to-object reflections still involve multi-sampling and can have some grain. A trick around that is to limit the reflection distance as mentioned in the manual).
To use mia_envblur, you must follow these steps:
As for the actual blur amount, you have two choices; Either you set a fixed amount of blur with the mia_envblur parameter Blur. But that is a bit boring... if you have different materials of different glossiness, you would need separate copies with different blur ammounts applies as environment maps to each materials... very tedious...!
Much better is to turn on the mia_material_blur parameter on!
This will drive the amount of blur from the glossiness setting of the mia_material. This works such, that mia_material "informs" the environment shader which glossiness is used for a certain environment lookup, and hence allows a single global copy of mia_envblur (applied in the global (camera) Environment slot) to follow the glossiness of multiple mia_materials, or even map-driven glossiness on a single material:
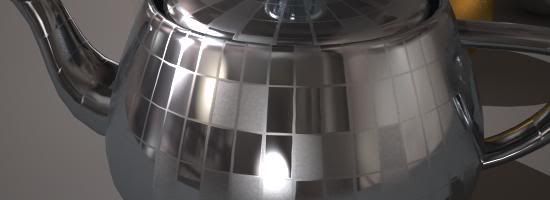
Very Visible Variable Varnishness
I can't stress enough how varying the glossiness with a map gives a nice feel of wear, tear and "fingerprintiness" of an object. And with mia_envblur you can do this without being ashamed and fear horrid render times.
Yes, mia_envblur works great together with the production shaders. Just "wrap" it around your mip_mirrorball shader, to do glossy lookups into it.
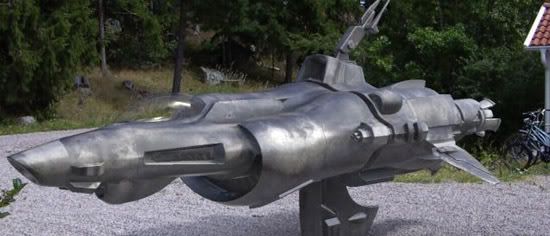
Perfect Production Partner
This spaceship (from TurboSquid) is mapped with a glossy reflection that is heavily varied (A whole "make a spaceship in the backyard" tutorial will probably appear later, if I find time).
Yes it does. Just a word of warning: be certain that the resolution parameter is set high enough to resolve all details in the environment you use. The "Gallileo" probe I use here has too many small lights in it for the default of "200" to be enough (this means the map is rasterized into a 200x200 pixel mipmap). But at 600 it works great. Also note that any non-glossy lookups into the environment map actually bypasses mia_envblur automatically, so these are looked up in the full resolution map!
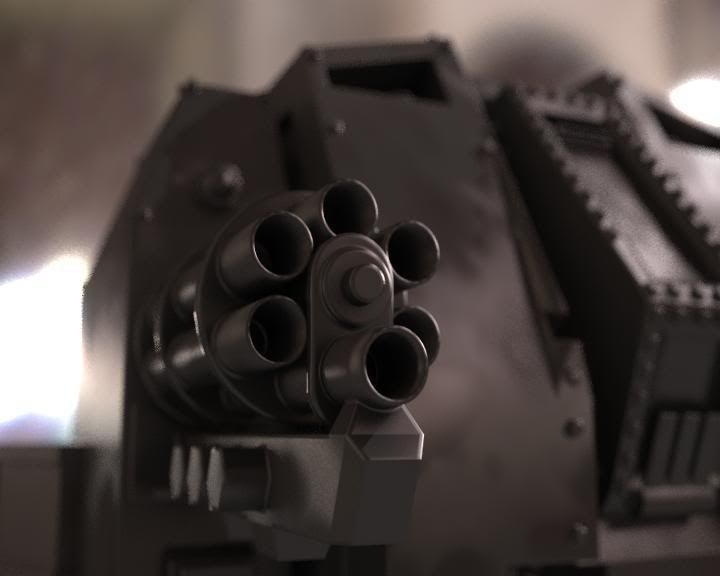
See for yourself in this DivX test animation, which includes above spaceship hovering over my backyard, the above gun-metal-black battle robot (also from from TurboSquid) and some spheres, including my attempt to do a "gnarly cannon ball".
For the record, these renders also uses the photographic exposure and Lume "Glare" shader. The animations rendered at about 1 minute per frame (on a HP x6400 Quad Core)
Hope this helps your glossy-thing-renders!
/Z
Formulating The Problem
Glossy Reflections in computer graphics is always a headache, since it invariable involves multiple samples, which invariably involves grain. Interpolation helps, but interpolation isn't really working well for complex geometries, and can be "detectable" in animations (i.e. you can often "see" that something fishy is going on w. reflections, so I advice against using interpolated reflections in animations).
But, you say, I need to have my semi-glossy space robot/gunship/whatever and I need to animate it, and I have this really contrasty HDR environment it must reflect... I would need to turn up samples to crazy levels... the animation would never be finished! What can I do!?
The solution: mia_envblur
This shader is another "sort of hidden" (depending on which application you are running, it's hidden away in 3ds Max but not in Maya, and it's existence isn't really marketed heavily... ;) )
What does it do?
Well, the documentation explains this fairly clearly, but in short:
If you have some objects in a scene which largely reflects an environment map (this bit is important; mia_envblur really dosn't do anything useful for, say, an architectural interior where objects reflect other objects, it only does it's job for environment reflections) and your environment is high-contrast, you tend to get grain as a result. Witness here some spheres n' stuff reflecting the good old "Galileo's Tomb" probe from Paul Debevec:
Grusomely Grainy
This is clearly not satisfactory, the grain is very heavy, causing slow renders due to a lot of oversampling happening. We can turn up the sampling in the shaders and get something like this:
Borderline Better
This looks nicer indeed, but the render time was nearly ten times of the above! Not something you'd want to do for an extended animation. And it would still glitter and creep around. Not good.
So... enter mia_envblur. The shader is used to "wrap around" some existing environment shader, i.e. it takes some other environment shader, rasterizes it into an internal mipmap, and can perform intelligent filtered lookups in a special coordinate space which behaves very close to doing actual glossy lookups to that environment with a near-infinte amount of rays!
Soothingly Smooth!
This is much nicer looking, and the environment reflections are smooth (but object-to-object reflections still involve multi-sampling and can have some grain. A trick around that is to limit the reflection distance as mentioned in the manual).
To use mia_envblur, you must follow these steps:
- Where your existing environment shader is connected, instead connect mia_envblur, and connect your original environment into it's environment input.
- In your mia_material, turn on it's "single_env_sample" parameter. This is very important or you will gain neither speed nor quality (although you will get a little bit of smoothing, but not supersmoothing of the reflections)
- Set the "resolution" high enough to resolve the details of your original environment.
As for the actual blur amount, you have two choices; Either you set a fixed amount of blur with the mia_envblur parameter Blur. But that is a bit boring... if you have different materials of different glossiness, you would need separate copies with different blur ammounts applies as environment maps to each materials... very tedious...!
Much better is to turn on the mia_material_blur parameter on!
This will drive the amount of blur from the glossiness setting of the mia_material. This works such, that mia_material "informs" the environment shader which glossiness is used for a certain environment lookup, and hence allows a single global copy of mia_envblur (applied in the global (camera) Environment slot) to follow the glossiness of multiple mia_materials, or even map-driven glossiness on a single material:
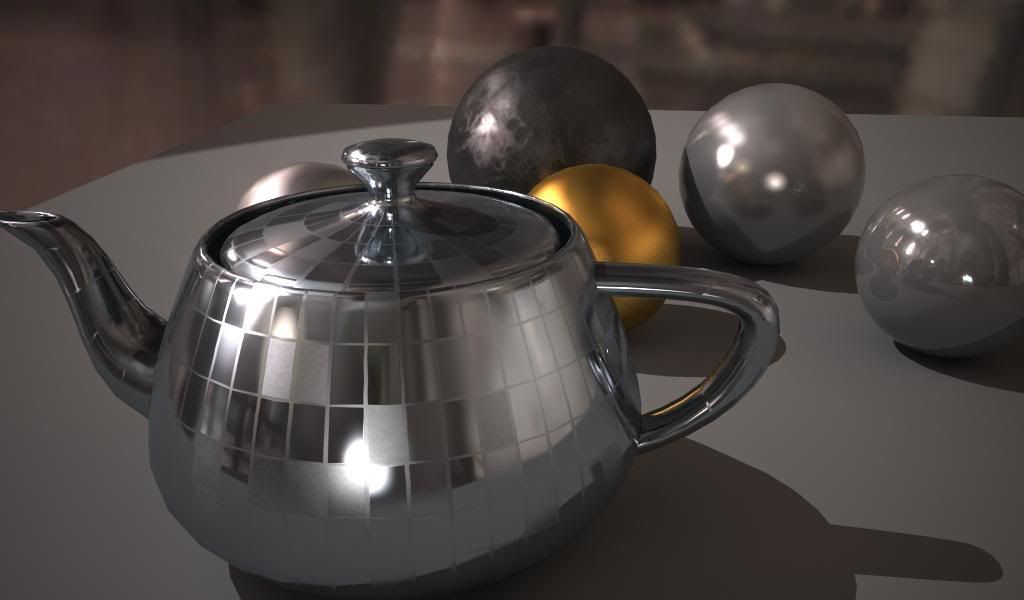
Very Visible Variable Varnishness
I can't stress enough how varying the glossiness with a map gives a nice feel of wear, tear and "fingerprintiness" of an object. And with mia_envblur you can do this without being ashamed and fear horrid render times.
Production Shaders?
Yes, mia_envblur works great together with the production shaders. Just "wrap" it around your mip_mirrorball shader, to do glossy lookups into it.
Perfect Production Partner
This spaceship (from TurboSquid) is mapped with a glossy reflection that is heavily varied (A whole "make a spaceship in the backyard" tutorial will probably appear later, if I find time).
Does it move?
Yes it does. Just a word of warning: be certain that the resolution parameter is set high enough to resolve all details in the environment you use. The "Gallileo" probe I use here has too many small lights in it for the default of "200" to be enough (this means the map is rasterized into a 200x200 pixel mipmap). But at 600 it works great. Also note that any non-glossy lookups into the environment map actually bypasses mia_envblur automatically, so these are looked up in the full resolution map!
See for yourself in this DivX test animation, which includes above spaceship hovering over my backyard, the above gun-metal-black battle robot (also from from TurboSquid) and some spheres, including my attempt to do a "gnarly cannon ball".
For the record, these renders also uses the photographic exposure and Lume "Glare" shader. The animations rendered at about 1 minute per frame (on a HP x6400 Quad Core)
Hope this helps your glossy-thing-renders!
/Z
Subscribe to:
Posts (Atom)