Formulating The Problem
Glossy Reflections in computer graphics is always a headache, since it invariable involves multiple samples, which invariably involves grain. Interpolation helps, but interpolation isn't really working well for complex geometries, and can be "detectable" in animations (i.e. you can often "see" that something fishy is going on w. reflections, so I advice against using interpolated reflections in animations).
But, you say, I need to have my semi-glossy space robot/gunship/whatever and I need to animate it, and I have this really contrasty HDR environment it must reflect... I would need to turn up samples to crazy levels... the animation would never be finished! What can I do!?
The solution: mia_envblur
This shader is another "sort of hidden" (depending on which application you are running, it's hidden away in 3ds Max but not in Maya, and it's existence isn't really marketed heavily... ;) )
What does it do?
Well, the documentation explains this fairly clearly, but in short:
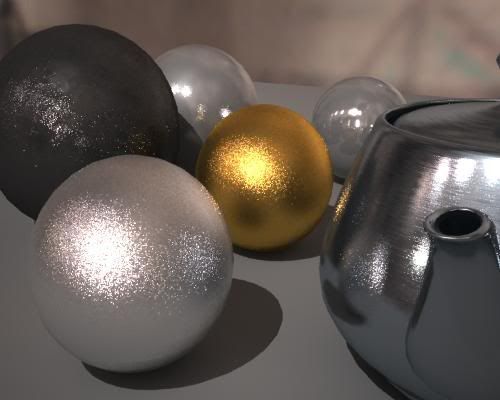
If you have some objects in a scene which largely reflects an environment map (this bit is important; mia_envblur really dosn't do anything useful for, say, an architectural interior where objects reflect other objects, it only does it's job for environment reflections) and your environment is high-contrast, you tend to get grain as a result. Witness here some spheres n' stuff reflecting the good old "Galileo's Tomb" probe from Paul Debevec:

Grusomely Grainy
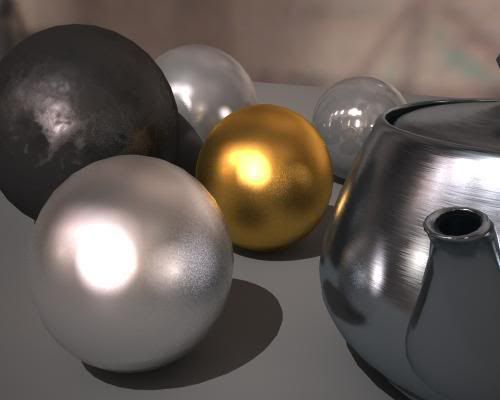
This is clearly not satisfactory, the grain is very heavy, causing slow renders due to a lot of oversampling happening. We can turn up the sampling in the shaders and get something like this:

Borderline Better
This looks nicer indeed, but the render time was nearly ten times of the above! Not something you'd want to do for an extended animation. And it would still glitter and creep around. Not good.
So... enter mia_envblur. The shader is used to "wrap around" some existing environment shader, i.e. it takes some other environment shader, rasterizes it into an internal mipmap, and can perform intelligent filtered lookups in a special coordinate space which behaves very close to doing actual glossy lookups to that environment with a near-infinte amount of rays!

Soothingly Smooth!
This is much nicer looking, and the environment reflections are smooth (but object-to-object reflections still involve multi-sampling and can have some grain. A trick around that is to limit the reflection distance as mentioned in the manual).
To use mia_envblur, you must follow these steps:
- Where your existing environment shader is connected, instead connect mia_envblur, and connect your original environment into it's environment input.
- In your mia_material, turn on it's "single_env_sample" parameter. This is very important or you will gain neither speed nor quality (although you will get a little bit of smoothing, but not supersmoothing of the reflections)
- Set the "resolution" high enough to resolve the details of your original environment.
As for the actual blur amount, you have two choices; Either you set a fixed amount of blur with the mia_envblur parameter Blur. But that is a bit boring... if you have different materials of different glossiness, you would need separate copies with different blur ammounts applies as environment maps to each materials... very tedious...!
Much better is to turn on the mia_material_blur parameter on!
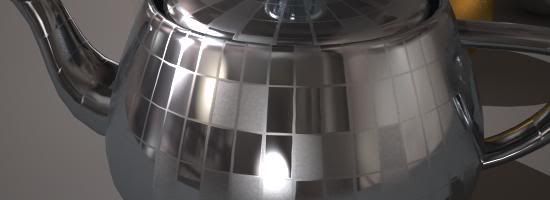
This will drive the amount of blur from the glossiness setting of the mia_material. This works such, that mia_material "informs" the environment shader which glossiness is used for a certain environment lookup, and hence allows a single global copy of mia_envblur (applied in the global (camera) Environment slot) to follow the glossiness of multiple mia_materials, or even map-driven glossiness on a single material:

Very Visible Variable Varnishness
I can't stress enough how varying the glossiness with a map gives a nice feel of wear, tear and "fingerprintiness" of an object. And with mia_envblur you can do this without being ashamed and fear horrid render times.
Production Shaders?
Yes, mia_envblur works great together with the production shaders. Just "wrap" it around your mip_mirrorball shader, to do glossy lookups into it.

Perfect Production Partner
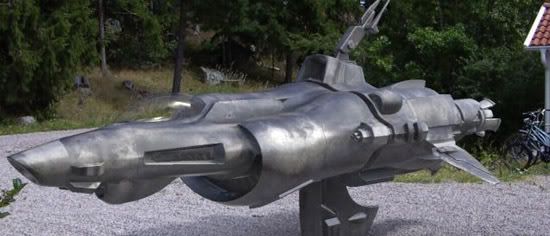
This spaceship (from TurboSquid) is mapped with a glossy reflection that is heavily varied (A whole "make a spaceship in the backyard" tutorial will probably appear later, if I find time).
Does it move?
Yes it does. Just a word of warning: be certain that the resolution parameter is set high enough to resolve all details in the environment you use. The "Gallileo" probe I use here has too many small lights in it for the default of "200" to be enough (this means the map is rasterized into a 200x200 pixel mipmap). But at 600 it works great. Also note that any non-glossy lookups into the environment map actually bypasses mia_envblur automatically, so these are looked up in the full resolution map!
See for yourself in this DivX test animation, which includes above spaceship hovering over my backyard, the above gun-metal-black battle robot (also from from TurboSquid) and some spheres, including my attempt to do a "gnarly cannon ball".
For the record, these renders also uses the photographic exposure and Lume "Glare" shader. The animations rendered at about 1 minute per frame (on a HP x6400 Quad Core)
Hope this helps your glossy-thing-renders!
/Z
24 comments:
Sorry for the obvious question, but where can we go to unlock the envblur shader in Max? I've unlocked the other production shaders so I'm betting it's not in the production_max.mi file. Thanks a ton for the help; we all owe you big time for holding our hands with the production shaders!
Ha, looks like I should have waited for that max restart before commenting. It looks like it's quite obviously located in the architectural_max.mi file; it appears in the Material/Map Browser as Arch:Environment Blur. For some reason I was looking down at the middle of the list with the rest of the mr Shaders. Thanks again Zap for all of the informative posts!
OMG, thank you! Put a big smile on my face and those that know me, know that's damned hard to do. Keep up the great work. I'd buy you a drink but I have no idea how to from here. Maybe SIGGRAPH next year.
Thanks a million times.
Hi Zap.
I was wondering what type of blur do you perform when you rasterize the environment.
Is it a stupid gaussian blur or something a bit more clever ( such as a diffuse convolution ) ?
cheers.
H.
Hey zap,
I was wondering how would the blurred environment thing here would be like when compared to how in XSI you can crank up the gaussian blur in the image clip node under "Effects" and thus get a blurred environment map at rendertime.
I'm sure there must be a difference. Could you enlighten me?
Thanks for the post. :)
is there any way to use the mia_envblur with an ibl node?
I've noticed some strange occurances when using the MR Prod Shaders and Render elements in Max 2008. Odd things like raytracing in an Object ID pass. Test it out for yourselves. Kind of hard to use if this problem persists.
Hey Master Zap.
First of all, thanks for the blog, it is really helpful to migrate from vray to mental ray.
With max 8 an before, mental was so complicated, but since max9, max 2008 i'm really loving it, better results than vray in less time and it's perfect for character animation, no flickering and a lot of possibilities.
But i have a question, i cannot put it here because it requires a picture for the explanation.
Can i mail you that question? is't a problem with final gather and after a lot of time i think it is a bug, but i'm not sure.
Please mail me your answer.
And one more time, thanks for the blog, it's awesome.
Juan Gea
Bone-Studio
http://www.bone-studio.com
great blog! thanks for putting all this together. I'm not a shading guy, but I admire what you do/did with this repository of yours. keep it up! and a happy new 2008!
I'm getting an error when i open maya after unlocking the production shaders.
// Warning: File not found: render_mip_motionblur.xpm //
Can you tell me how to fix this?
Thanks
more hidden gems please
I've been testing this quite a lot to try and cut down on render times.
Using the glossy mia material technique with env-blur map doesn't seem to work inside glass objects.
Guess that's because there's an object between it and the environment map?
Hi Zap,
I have a problem with this trick,
When use it on a high resolution output size,like 4096*4096, the blur effect is not enough because the limit blur size.
even I try to adjust the mi file description,it still not work.
Is there any solution ?
Cheers~
Hi Zap,
I've also been having a bit of a problem with the env_blur shader. It seems whenever I do a camera move in a scene using the env_blur shader, on certain frames, the map seems to flick - it looks as if the blur is suddenly rocketing up to a huge amount. problem is if I re-render the bung frames they always come out the same. If I alter the blur amount it seems to come out better, but then other frames will end up wacked out... arg! Any ideas?
Hi Zap! Using the envblur with the production shaders on Max2009 doesn't work... If I use this as an environment map, it works:
Environmnent Blur -> Bitmap(HDR Image)
But if I use this as an environment map, it doesn't:
Background Switcher
-> Background Image
-> Environment/Reflections -> Environment Blur -> Bitmap (HDR Image)
And neither if I use this:
Environment Blur -> Background Switcher
->Background Image
->Environmnet/Reflections -> Bitmap (HDR Image)
Would you please tell me if some of this should work?
Thanks in advance!!
Good news! Closed Max, started a new scene, and this IS working as an environment map:
Background Switcher
-> Background Image
-> Environment/Reflections -> Environment Blur -> Bitmap (HDR Image)
Hi Zap,
I'm having problems with mia gloss on a high contrast interior scene... interpolation seems to return the same result no matter what the gloss setting is so is it high sample time for me?
what's more efficient: turning up gloss samples or scene sampling?
Thank you so much for this tutorial. I saw it months ago but it seemed so intimidating at the time. After downloading the video and following your diagram for the hypershade links I'm very please with the results. You are the master!
Using the IBL node with the envBlur will break Final Gathering.
Use the mib_lookup_spherical instead.
This work fine... until I render animation. Reflection flick on every frames! the only way to stop flicking is to disable "single sample from environment" but you said it have to be activated.
any help please?
OK I think I know why the animation is flickering. You have to use Final Gather with Environment Blur. I tried with Ambient Occlusion only and the result flicker reflection on every frame.
I cannot achieve good results in flat surfaces, like boxes.
Can someone help?
Hey there,
Thanks for the great blog. I keep coming back to this mia_envblur, but I still can't figure out--it doesn't appear to do anything for me. I've edited the architectural_max.mi file to get rid of the 'not'. I've put it in my environment slot. But it doesn't look any different than without. Is it just that you can't use it with A&D materials? Or am I supposed to be connecting it in some way via the "mental ray connection" at the bottom of the editor? Any help it appreciated.
Thanks,
Nivek
Post a Comment