Showing posts with label production library. Show all posts

2009-08-25

Digital Tutors mental ray training


My friend Sylvain Berger (who also runs a rendering blog over at http://kobayashystips.blogspot.com/) alerted me to availability of mental ray training over at Digital Tutors.

You can sign up for an account and access a subset of the trainings free of charge as samples. One of these free samples, which Sylvain points out, happens to be a really nice training on using the production shaders in Softimage, which I can recommend.

For those Softimage users who took my masterclass (below) and were annoyed by all the UI happening inside 3ds Max, and wanted to find those equivalent buttons and shaders in Softimage, this training is for you.


/Z

2009-08-03

The SIGGRAPH 09 masterclass is LIVE

Clickety here for the masterclass "GIANT ROBOTS: Using mental ray shaders for introducing CG elements into real shots".

Giant Robots 2009 SIGGRAPH Masterclass

You need to register 1st, but it's free!

Enjoy me rambling for 1.5 hours ;)

UPDATE: Link is now back online - but it seems to require Flash 10. I had Flash 9 in Firefox, and it did not work, but never gave any error message.

/Z

2009-07-31

SIGGRAPH Masterclass: GIANT ROBOTS (Using mental ray shaders to integrate CG elements into real scenes)

Hello Everybody!

Sorry for being incommunicado for a while. I've been busy, and I've been on Vacation.

On Monday, SIGGRAPH kicks off, and for the first time in many years I will actually not be going there... however, I will be there "in spirit". As usual, I have an Autodesk MasterClass running, only, this year the MasterClasses will be ONLINE, and not live in-person things.

My class is called "Giant Robots: Using mental ray shaders to integrate CG objects into real scenes", and it will be available from August 3rd 2009 somewhere on www.the-area.com

Here's a teaser:


I'll let y'all know when the actual class is on, and give a direct link to it.

Enjoy... and for those actually going to SIGGRAPH in New Orleans... have a beaker for me ;)

/Z

2008-11-21

Singapore Sling: SIGGRAPH ASIA 2008

In December, I am flying to Singapore to attend SIGGRAPH ASIA.


Singapore. I think.


This will really be my first visit to this corner of the world, so it will be interesting. Assuming the current planning remains, you can most likely find me around our mental images corner of the NVidia booth, as well as doing mental ray demos in the Autodesk booth. I'll be tweeting as well, as usual.

Among other things, one thing I will be doing at SIG' ASIA is to do a re-run of my masterclass from SIGGRAPH 2008 in Los Angeles, entitled "Miracles and Magic".

It was clear I had tried to cram way too much stuff to fit in the 1.5 hours I had; I had to skip every single live demo, and leapfrog little gems to just to get through it all. But I did get through it all, at a breakneck pace.

The Audience looked somewhat like this:


So... the idea here is to re-do pretty much the same masterclass, but as a 3 hour version. This would give us a more ... relaxed... pace, and the demo bits would actually fit!

So, to be totally clear. If you were at my Autodesk masterclass (not the "SIGGRAPH Course" on "HDRI for Artists") held at the Westin Bonaventure in Los Angeles, you already saw this, but very ... quickly. :)

So if you weren't in L.A, and are interested in the same topics, feel free to attend. The blurb for the class reads as follows:


  • The course will focus on photo-realistic rendering in mental ray in the context of visual effects, as well as for product and architectural visualization. The session will open with a quick introduction to photometric concepts followed by a practical guide to a linear workflow and why proper gamma correction is imperative. It will then move on to efficient techniques for achieving highly realistic results when combining CG and live action by combining existing tools together (e.g. the architectural and production shader libraries), techniques for rendering flicker-free animations with Final Gathering, and tips for conserving memory.


For more information about attending the Autodesk Master Classes, go here.

/Z

2008-05-08

SIGGRAPH 2008 talks

Phew. I just finalized the course notes for my SIGGRAPH talks.


As mentioned before, I will be holding an Autodesk masterclass with the title of "Miracles and Magic: mental ray technology in Photo-real Rendering for Production". This will - on popular demand - be a lot about gamma and linear workflow (I actually clocked the pure presentation "talky" part on this segment alone at 30 minutes, sans practical demo bit!).

Beyond the LWF/Gamma stuff, it'll talk about CG/Live Action integration, and tips for rendering flicker-free animations, and some other stuff (assuming I can get through it all in time ;) ).

Unless things change, the masterclass itself is from 1:30PM to 3:00PM on Thursday, August 14:th. There is also a "QA with all the masterclass presenters" on Wednesday, August 13:th at 9:00AM that I will also participate in. The full agenda and more info is here.

Furthermore, I will also be co-teaching a SIGGRAPH course entitle "HDRI for Artists" together with Kirt Witte (Savannah College), Hilmar Koch (ILM), Gary Davis (Autodesk) and Christian Bloch (HDRLabs).

The class is set for Monday, 8:30-12:15 in room 502A.

To make it easier to track these things, I've added a twitter feed, plus I gave this place a new, short, easy-to-remember URL:

www.mentalraytips.com


Enjoy.

/Z

2007-10-30

Production Shader Examples

So, who wants to know more about the production shaders? Raise of hands? (See the introductory post, if you missed that.)


OK, I don't have time for an extravagant essay right now, but what I did do is to put a set of examples online.

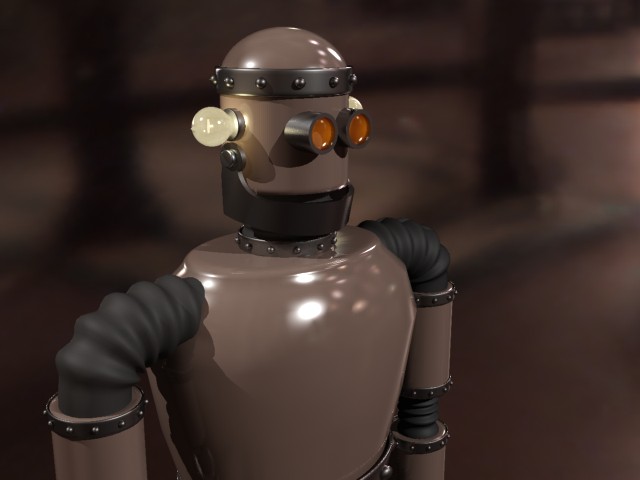
The example uses some geometry (in some cases, our friend "Robo" pictured here on the right) and shows how to use this together with the production shaders, both to introduce our geometry into various backgrounds, as well as using features like the motion blur and motion vector code.

General Overview


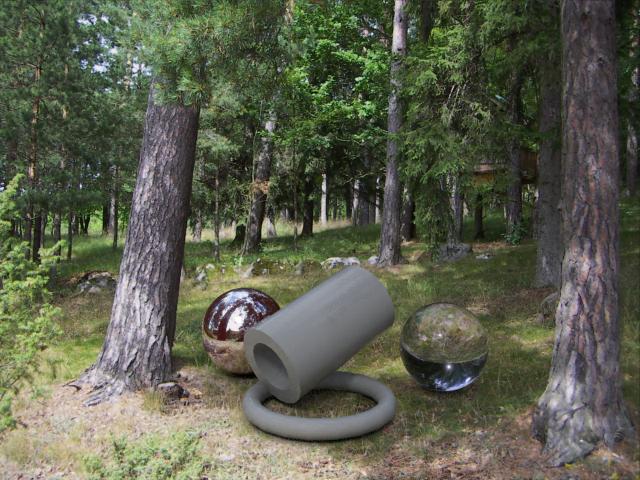
The Production library does a lot of things, but one of it's specialties is to help us to integrate a CG object into a photographic background, with the help of a photo of the background and a photo of a mirror ball taken at the same location in the same camera angle as the background photo. So, to play with that, we need a set of backgrounds, with matching mirror ball photos.

As luck would have it, I happen to have just that. (Amazing, innit?) ;)

These backgrounds are available in this backgrounds.zip file. Please download that and unzip before downloading any of the demos scenes (I also apologize for not having time to put Robo into any of the Maya scenes, but he was out at a party the day I made those file and didn't come home until late....)

In a hurry?


If you don't want to read, but play play play, you can go directly to this directory and you will find the files.

Examples for 3ds Max 2008


The 3ds Max demo scenes are sort of "all in one" demos, demonstrating a scene using the mip_matteshadow, mip_rayswitch_environment, mip_cameramap and mip_mirrorball to put a CG object into a real background as described in the PDF docs.


The file 
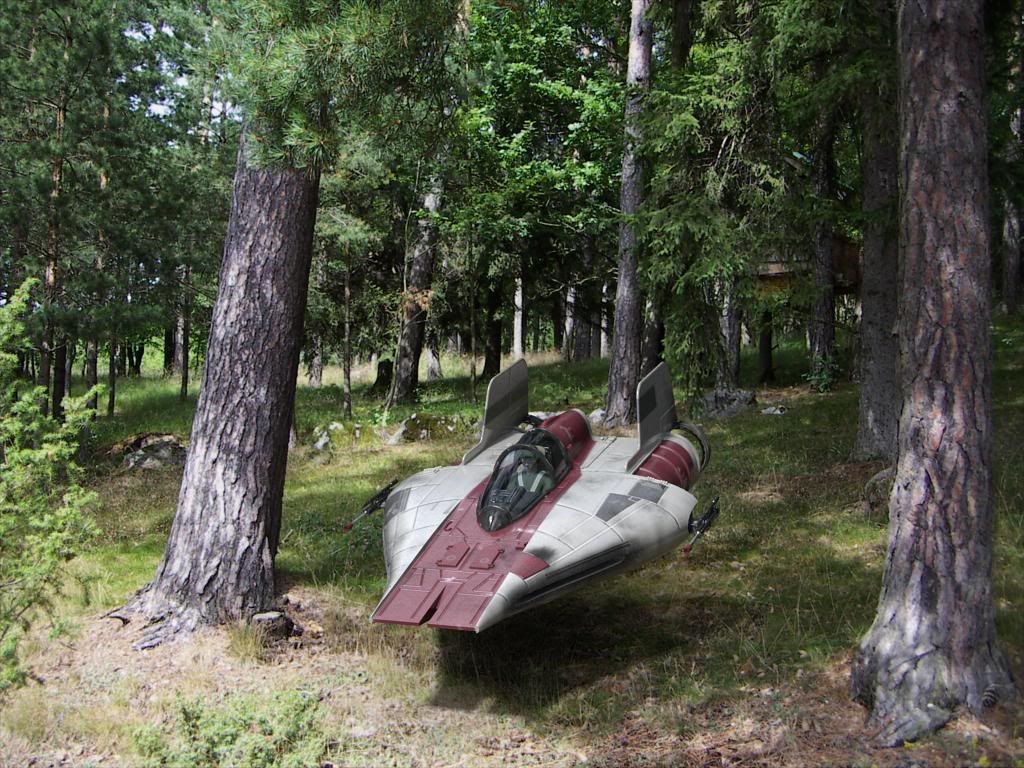
robot-1.max puts Robo in my back yard, 
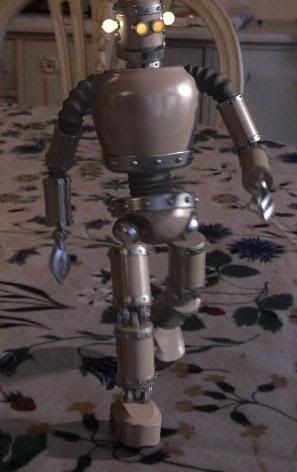
robot-2.max puts him on my dining room table, robot-3.max on a window ledge, robot-4.max out in a gravel pit (how absolutely charming place to hang out) and finally 
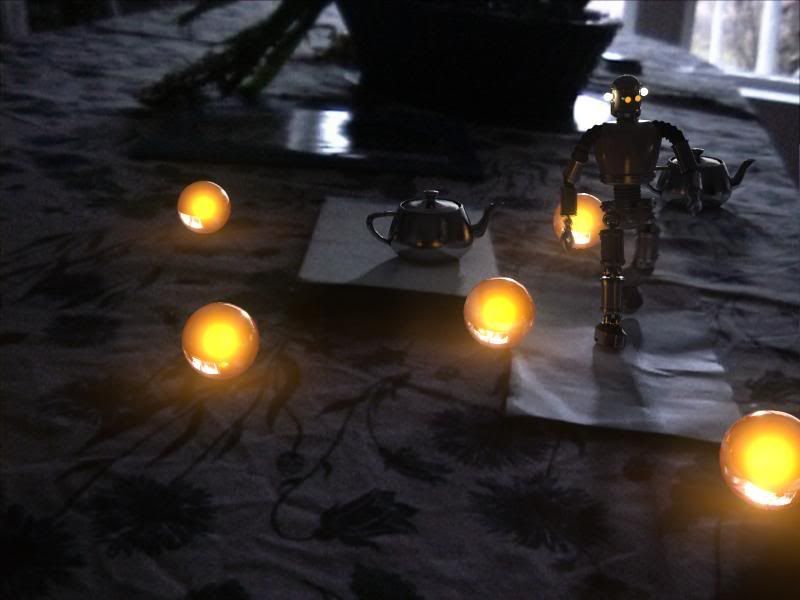
robot-5.max on my dining room table but at night, and some alien globules has landed...


They all work pretty much the same, i.e. the same settings only swapping in different backgrounds and mirror ball photos from the backgrounds.zip file.

The exception is the file robot-4-alpha.max which demonstrates how to do the same as robot-4.max does, but set up for external compositing (see more details below in the Maya section).


Examples for Maya 2008


The examples for Maya are more "single task" examples, and demonstrates one thing at a time.

mip_matteshadow1.ma and mip_matteshadow2.ma both demonstrate how to put a set of CG objects into a real background, using the exact same techniques as for 3ds Max above:


The file mip_matteshadow2b.ma demonstrate the same scene as mip_matteshadow2 but set up for external compositing (what is called "Best of Both Worlds" in the manual).

To recap from the manual briefly: In the normal mode (when you composite directly in the rendering and get a final picture including the background right out of the renderer, you use mip_cameramap in the background slot of your mip_matteshadow material, and in your global environment (in the Camera in Maya, in the "Environment" dialog in 3ds Max) you put in a mip_rayswitch_environment, which is being fed the same mip_cameramap into it's background slot, but into it's environment slot it is being fed a mip_mirrorball.

To do the "Best of Both Worlds" mode (to get proper alpha for external compositing, and not see the background photo in the rendering - but yet see its effects, its bounce light, its lighting, its reflections, etc. - one need to do a couple of changes from the above setup:


  • In the global Environment should still be a mip_rayswitch_environment as before, the only difference is that instead of putting mip_cameramap into it's background slot, you put transparent black (0 0 0 0).

    The trick in Maya is that you cannot put an alpha value into a color slot. We can cheat this by using the mib_color_alpha from the base shaders, and set its multiplier to 0.0.

  • In the background slot of your mip_matteshadow you used to have a mip_cameramap with your background. What you do instead, is to put in another mip_rayswitch_environment, and into it's environment slot (important, yes, the environment and NOT the background!) you put back the mip_cameramap with your background photo, and in it's background slot you again put transparent black (using same trick as above).


Having done this (as is already is set up in the mip_matteshadow2b.ma example) you will get this rendering:


This image contains all the reflections of the forest, the bounce light from the forest, the reflection of the environment from the mirror ball... but doesn't actually contain the background itself.

However, it has an alpha channel that looks like this...


...which as you see contains all the shadows. So compositing this image directly on top of the background in a compositing application, will give you the same result as the full image above, except with greater control of color balance etc. in post.

Maya in Motion


There is three further example files for Maya:

mip_motionblur.ma, which demonstrates the motion blur, and mip_motionvector.ma and mip_motionvector2.ma who both demonstrate how to output motion vectors.


I know these are rudimentary examples, but the day only has 48 hours... ;)

To quote the Governator: "I'll be bak".

/Z

2007-10-26

Production Shaders: "Hidden Treasures" of 2008

May I present to you, the "production" shader library.


What? Where? Production shaders?
Well, here's the story:

The Hidden Shaders


If you have installed 3ds Max or Maya 2008, you will have obtained mental ray 3.6, and with mental ray 3.6 comes the production shader library.

However, in neither of Max or Maya are these shaders exposed by default to the end user. They are hidden, and therefore "unsupported".

Still, they are there, and they can be used. But to do so, one must first "unhide" the shaders.

Why "hidden"


Simple matter of resources of Quality Assurance at Autodesk. The shaders has not gone through enough torture - yet - to be signed off by QA as "officially supported". But that's where you, my adventurous mental ray addict, come in! Consider this an extremely public beta, if you will....

How do I "unhide" them?


Unhide instructions for 3ds Max 2008 are here

Unhide instructions for Maya 2008 are here

What are they


The production shader library is a set of tools, some simple, some complex, to aid in doing production rendering, i.e. in a visual effects context.

There are two basic categories of shaders:

Simple
First we have the simple utilities like applying a gamma to a color, or giving different results for different "ray types" (reflection rays, transparency rays etc.). These shaders are very simple, and you probably have found similar shaders online before. These shaders are not better than those other shaders that do the same thing, they are simply a standard set that now ship with all products. I.e. "mip_rayswitch" isn't terribly different to Control Studio's "ctrl_rays", but you don't have to install anything to use it.

Advanced
Then we have the more complex shaders, such as the 2.5d motion blur shader, or the matte/shadow/reflection system used to cast shadows (and reflections) off of a stand-in object in your scene, for integrating CG objects into a background plate.

A lot of examples of the mip_matteshadow and other production shaders are available as a small demo movie constructed for siggraph, it's available as YouTube as well as WMV, QuickTime and DivX versions.


What do they do?


The main intent is to simplify the workflow of compositing CG objects into background plates, and other visual-effects related tasks that one may run in to on a daily basis.

In some cases they exist to give a simple workflow to a simple thing. For example, the mip_cameramap is a simple camera mapping shader that simply projects back an image from the render camera (and only that camera) "into" the scene 3-dimensionally (unlike, say, mib_lookup_background, Max's "Screen" mapping, or similar).

There are more complex "camera projection" shaders out there both for Maya and Max that can do similar jobs, but at a slightly higher effort. Again, the logic here is to provide the simple tool that can do the job, and if you need the more advanced feature, use the more advanced feature.

Similarily, the mip_mirrorball shader is for a simple unwrap of a mirror ball into an environment map when taken from the same camera angle as the background plate. For anything more advanced you would probably have to unwrap the mirror ball image in some unwrapping software and apply as a spherical map... or maybe you are a high-end user that uses SpherOn cameras and don't even use mirror balls... then ignore this shader, use your more powerful tools.


Mark my words, I will be posting quite a lot on the topic in the months to come, but meanwhile you can read the PDF documentation. In Max, the names of the shaders will appear slightly different than in the manual, but you can figure that our rather quickly, I hope.

That's all I have time for for for now:

Stay tuned to future blog posts on the subject.

/Z

2007-08-27

Random Dancing Robots - The Post SigGRAPH Post


Phew!

Never did I know attending SigGRAPH would make me so busy I wouldn't have time to make a post post SigGRAPH! Oh well, now I finally take five minutes to post a post.

First, I like to remind everyone of the mental ray wiki over at mymentalray.com, which is really taking off with the good help of Martin Breidt, especially his "mental ray cookbook" section.

Secondly, SigGRAPH was a blast, although I missed much due to, as always, lots of meetings. One of the funniest events happened when some random straggler (apparently not completely awake) wandered into one of our meetings and grabbed a coffee and sat down.... after some investigation we figured out the guy was in the wrong room.... he staggered out mumbling "at least I got free coffee". He had no pants on, for some reason. ;)


Thirdly, I can finally talk about mental ray 3.6 and the new toys that come with it. As shown in various posted demos, there are some new architectural stuff, like the portal lights, which allows a really quick set up for perfect quality skylight coming in through small windows.... as well as other things.


Also included is my own little "baby", the production shader library. I promise that you'll read a lot more about that in this blog as things get released. A lot.

For now, you'll have to make do with watching random dancing robots.


But hey, random dancing robots never hurt anyone, did they? Thought so.


/Z