Showing posts with label Camera. Show all posts

2007-10-25

Max 2008: Physical Camera with DOF and motion blur

So, does anyone want a Physical Camera for mental ray in 3ds Max 2008? Read on...


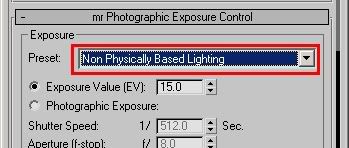
The Photographic Exposure Control (mia_exposure_photographic) gives you values in f-stops and shutter speeds like in a real camera. However, it only applies to the exposure of the image (i.e. the brightness, basically).

In a real camera, the above mentioned parameters affect the depth of field and the motion blur of the camera.

This isn't supported out-of-the-box - the exposure control really only deals with the exposure.

A second thing is that the exposure knobs being "camera oriented", but they are not ON the actual Camera object. Whereas it would make more sense if these parameters "lived" in the UI of the Camera.

To try to solve these issues, I wrote a little "proof of concept" script to test out what such a UI would perhaps look like. It's very clumsy in many ways and an ugly hack, because it's just a "scriptable plugin", and scriptable plugins has a ton of limitations in max.

First of all, a scriptable plugin can only extend an existing object, not make a "new" one. Secondly, scriptable camera can only extend the "free" camera due to technical limitations of MaxScript (well, the MaxScript docs tell me so anyway), but most people "want" to use a "Target" camera.

Due to this limitation, the camera always gets created in "Free" mode, but after it has been created, you can switch it to "Target" mode. Ugly, but... livable.


How to use this plugin hack


1. Download this plugin and save into the "plugins" directory under your 3ds Max main directory.

2. Now, either restart max, or just load the plugin manually as well from the MaxScript menu.

3. Now, under your "cameras" you have a new "mr Camera" item.

4. Insert it - unfortunately always comes in as a "Free Camera". The UI at this point will look like the old camera.

5. Go to the "Modify" tab to see the "new" UI.

6. Play, rejoice, etc.

Remember, this is an ugly unsupported quick hack. The "mr Camera" simply "feeds" other existing plugins with value (mr Photographic Exposure, mental ray Depth of Field, motion blur, etc.) and doesn't really "do" anything by itself.

And it probably has more bugs than you can shake a stick at... but is provided here "for fun".

Enjoy.

/Z

2007-10-23

3ds Max 2008 released: Some Known Issues

Or "Why do my brand new 3ds Max 2008 render black when I choose a mental ray render preset"?


3ds Max 2008 has been released, and as always, some things sneak in the wasn't really intended in the final version.

Here, a "minor edit" to the rendering presets became less minor than was intended;

Since 3ds Max 2008 contains the new mr Photographic Exposure control, the rendering presets (y'know, the ones down at the bottom of the render dialog) for daylight was supposed to be changed from the old Log exposure to the new Photographic exposure set for "sunny day" lighting.

The problem? That this was done.... but by accident all mental ray render presets got this setting.

Yes, even the "plain old" settings got, by mistake, a setting suitable for a superbright sunny day enabled:


The setting accidentally put in


But a sunny day can easily be lit by 100000 lux. And your average interior surely is not. So out of the box, starting up max and putting in some photometric lights (try to use the photometric lights as often as possible, btw) you would get a really dark scene.

And even worse, putting in some non-photometric scene would yield a pretty much completely BLACK scene. Why?

Well, the new mr Photographic Exposure Control has a 2nd feature; The feature of treating any "oldschool" value as real, physical cd/m^2 values (if you wonder about what a "candela per square meter" is, go back to the "Gnomes and Basketballs" post).


The Units Setting


This means that if an "oldschool" light of the arbitrary intensity value "1.0" shines perpendicular to a white (100% reflective) lambertian surface (i.e. plain old white diffuse thingamabob), this will emit light that is interpreted as 1 cd/m^2.

Now that is really really really really REALLY really dark.

I.e. turning on max, loading a mental ray render preset, and putting in and oldschool "Omni" light gives you a black render. Not good.

The fix? Easy.

Do one of three things:

Either:

1: Turn it off altogether

Hit "8" to bring up the "Environment/Effects" dialog and do as follows:


Exposure Control Turned Off


By simply turning off the exposure control, you are back to a "known" behavior. However the exposure control is really neat and gives very nice images... so I don't really recommend that method!


2: Use the exposure controls "non physical" mode


Exposure Control in "Non Physical" mode


This is better; it still gives you all the nice image control of crushing blacks, taming highlights, camera vignetting and saturation controls, but it uses a fixed unity gain, i.e. the intensity of the pixels does not change (except it applies a gamma correction if the 3ds Max gamma is disabled, if the 3ds Max gamma is enabled, that gamma is used).

However, it is not perfect just because of the fact that you lack any control over exposure; the "non physical mode" is locked to unity gain with no control over it.

There is, however, a third variant:

3: Use the exposure control with an EV=0.0


Exposure Control with an EV of 0.0


It so happens that when using the "oldschool pixels equal cd/m^2 mode" (pictured above) the EV value of zero (0.0) is very close to the "unity gain" mode set by the "Non Physical" mode. But you can change it up or down to re-expose the scene.

So for a scene lit completely with "oldschool" lights (non photometric), that is the easiest setting with the greatest control.


A further note on the units / physical scale


Now if you have an old scene with a blend of photometric and non-photometric lights, you may want to revert to the old behavior of using the "physical scale" setting, which exists in the old Logarithmic exposure control.


Using a "Physical Scale" like in the past


In this mode you cannot use the "EV=0" setting, you probably need to pick one of the "indoor" presets, or just play with the EV until you get a "nice" image, because this means that now an oldschool light of intensity "1.0" will equate to an illuminance of ~1500 lux when perpendicular to a surface, so an exposure "suitable" for that amount of light must be used.


Hope this helps!


/Z