2009-09-30

My appearance on the FXGuide Linear Workflow Podcast

FXGuide Linear Workflow Podcast


Mike Seymour of FXGuide/FXPhd lost in China


I was recently interviewed by my good friend Mike Seymour over at FXGuide.com about linear workflow and linear compositing in a visual effects context.

You can listen to us ramble on the topic for nearly an hour by right here, or you can read a bit about it and comment here where you can also subscribe to the podcast for more glorious FX geekiness.

In the podcast, I mention Stu Machwitz about 1024 times. You can find Stu's blog over at ProLost.com (He doesn't consider it profound - get it?), and Stu even wrote a very lovely note on his blog in response, very heartwarming, thank you Stu! *wipes tear from eye*

Errata


Of course, as is when I ramble several run-on sentences for almost an hour, som errors creep in. After listening to it, I realize I misspaketh on a couple of places (disregarding some grammar snafu's, after all, I'm Swedish, darnit!)

  • I incorrectly attribute the creation of the EXR format to Pixar, I of course meant ILM. Apologies to both parties.
  • When describing the math of the "screen" composit operation, I say "sum" where it should be "product", i.e. the correct sentence should be "one minues the product of one minus each of the components". Duh. I.e. (1 - ((1 - A) * (1 - B)))

FXGuide and FXPhd


If you guys don't know about FXGuide, and their companion training site FXPhd, I suggest you check them out. These guys are very passionate people with a great knowledge of visual effects techniques, and they do some very nice stuff.

LinearWorkflow.com


Going to LinearWorkflow.com today isn't terribly interesting, but some stuff is coming up in a not too distant future. I just have other higher-priority work happening right now... stay tuned... :)

And, BTW, don't buy that stupid T-shirt, it's CafePress and it actually came out not-so-pretty.

/Z

2009-09-14

mental ray tutorials by Jeff Patton

If you follow this little link you will end up on a place where you can purchase (cheaply!) tutorials by my good friend and mental ray guru Jeff Patton.

They cover all sorts of topics from stuff all the way over to things ;)

Check them out!

/Z

2009-08-25

Digital Tutors mental ray training


My friend Sylvain Berger (who also runs a rendering blog over at http://kobayashystips.blogspot.com/) alerted me to availability of mental ray training over at Digital Tutors.

You can sign up for an account and access a subset of the trainings free of charge as samples. One of these free samples, which Sylvain points out, happens to be a really nice training on using the production shaders in Softimage, which I can recommend.

For those Softimage users who took my masterclass (below) and were annoyed by all the UI happening inside 3ds Max, and wanted to find those equivalent buttons and shaders in Softimage, this training is for you.


/Z

2009-08-03

The SIGGRAPH 09 masterclass is LIVE

Clickety here for the masterclass "GIANT ROBOTS: Using mental ray shaders for introducing CG elements into real shots".

Giant Robots 2009 SIGGRAPH Masterclass

You need to register 1st, but it's free!

Enjoy me rambling for 1.5 hours ;)

UPDATE: Link is now back online - but it seems to require Flash 10. I had Flash 9 in Firefox, and it did not work, but never gave any error message.

/Z

2009-07-31

SIGGRAPH Masterclass: GIANT ROBOTS (Using mental ray shaders to integrate CG elements into real scenes)

Hello Everybody!

Sorry for being incommunicado for a while. I've been busy, and I've been on Vacation.

On Monday, SIGGRAPH kicks off, and for the first time in many years I will actually not be going there... however, I will be there "in spirit". As usual, I have an Autodesk MasterClass running, only, this year the MasterClasses will be ONLINE, and not live in-person things.

My class is called "Giant Robots: Using mental ray shaders to integrate CG objects into real scenes", and it will be available from August 3rd 2009 somewhere on www.the-area.com

Here's a teaser:


I'll let y'all know when the actual class is on, and give a direct link to it.

Enjoy... and for those actually going to SIGGRAPH in New Orleans... have a beaker for me ;)

/Z

2009-06-04

MetaSL shader library opens

Just went live....


This is the first glimpse into the MetaSL material shader library....

http://materials.mentalimages.com


I will post more details later, but until then - have fun ;)

/Z

2009-06-02

"Star Wars: Old Republic" Cinematic

Blur Studio... again*. And using mental ray.... of course....


* = You can tell from all the blowing embers ;)

/Z

2009-05-27

The joy of Airports

Just a short reminder of the EndUserEvent.com event. Posted from the airport. :)

C U There.

As in all my "appearances", check for QiK updates and tweets for last minute... stuff.


/Z

2009-05-15

3ds Max 2010, MetaSL and mental mill

Wouldn't it be fun if....


While working in the viewport wouldn't it be nice if the thing you rendered was faithfully represented in the viewport? At least as faithfully as technically possible?

Wouldn't it be neat if the left part of the below was the final render and the right part would be what you saw in the viewport, while working with it?


(click to enlarge)


Oh wait - that is exactly how it looks in 3ds Max 2010! Oh no, how can this be? Is it magic? Is it elves? No, it's MetaSL, and mental images mental mill technology.

What happens in 3ds Max 2010 is that several of the shaders has been given an implementation in the MetaSL shading language. MetaSL is mental images renderer agnostic shading language. When this shading language is taken through the mental mill compiler, out the other end drops something that can fit multiple different graphics hardware, as well as several different renderers!

This way, no matter if the graphics hardware is NVidia or ATI, you will see the same thing (or as close as the card can afford to render) using only a single MetaSL source shader.

Viewport accuracy


Look at this image, which is the difference between the render (on the left) and the viewport in the previous version, 3ds Max 2009:


(click to enlarge)


Notice how horrible the viewport (on the right) looks, how harshly lit, unrealistic, and oversaturated it looks? The thing to take home from this is that the main reason that this looks massively different is that the image on the right is neither gamma corrected, nor tone mapped.

I mention this to illustrate the importance, nay, imperativeness of using a proper linear workflow, with a gamma corrected and tone-mapped image pipeline.

So while the lighting and shading itself is much more accurate in 2010 than 2009, the key feature that really causes the similarity between the render and the viewport is the tone mapping and gamma correction.

But naturally, the additional accuracy of the shading and lighting drives this home even more: See below a couple of different lighting scenarios, and see how well they match the render (again, render on the left, viewport on the right):


(click to enlarge)


After playing around a bit (tip; use the 3ds Max "light lister", you can get:


(click to enlarge)


So, using this feature, with the help of the MetaSL technology, you can make a decent set of lighting decisions and "look development" in realtime in the viewport. That's pretty neat, if I may say so myself ;)

So what about mental mill


Now nothing of the above is the end-user using mental mill. It is still using the mental mill compiler "under the hood"; MetaSL versions of 3ds Max shaders are compiled for the hardware, and used in the viewport.

But in 3ds Max 2010, the end user can also use MetaSL and mental mill directly. And yes, not only for hardware rendering in the viewport, but for mental ray rendering as well!!

First, please note that this is a 1st step integration of mental mill into 3ds Max. It has some issues (we know some quite well), and even a couple of bugs snuck into the final release (we are also very aware of these). But the general workflow is that you:

  • Create a shade tree inside the mental mill Artist Edition that ships with 3ds Max
  • Save this as an .xmsl file
  • Insert a "DirectX material" (yes, this makes you think this is only for HW rendering, since in the past "DirectX material" was only used for such things)
  • Load the .xmsl file into it
  • See the material in the viewport and render it with mental ray!


Now, as I mentioned above, there are some known issues in this 1st integration, to be aware of:


  • In mental mill you always have to build a Phenomena, not just a free standing shade tree. So your workspace in the mill should contain a single Phenomena representing your new material.
  • The last node must have a single output. This is actually a bug, and it will be fied, but for now, if your root node has many outputs (like for example the Illumination_Phong does), just pipe it's main output through some other shader (like Color_Brighness or similar) to make sure the final output node only has a single output.
  • Due to a difference in texture coordinate handling in 3ds Max mental ray and MetaSL, UV coordinates must be connected explicitly. So if you include, say, a texture looup node, you must include a "State_uv_coordinate" node to feed it coordinates. Inside mental mill you will really not see any difference, since the built in "default UV's" work there, but without doing this mental ray will render it incorrectly.
  • There was recently discovered an issue with localization; it seems that if your Windows system is set to use "," rather than "." for the decimal separator, this causes an error in interpreting some MetaSL code. For now, the workaround is to change your windows decimal separator settings to "."; sorry for the inconvenience :(
  • While you can change the shader in the mill and re-load it into the DirectX material and see the viewport update, the mental ray loaded version of the shader will not update automatically; be careful about this. You can force an update by renaming the phenomena and the file so mental ray loads it as a "new" shader.


Having taken the above things into account, though, your MetaSL shader should render pretty much exactly the same in mental ray as they appear in the viewport!

Some really snazzy things can be rendered thusly.

mental mill Standard Edition


The "Artist Edition" of mental mill sipping with 3ds Max can only work with the shipping nodes, not custom MetaSL nodes. It can also only export hardware shaders. (While this may sound like a contraditction to what I said above, note that you are not exporting the shader from mental mill in the 3ds Max 2010 workflow, you are saving the mental mill project (.xmsl) itself, and it is 3ds Max that is able to load this and render it in mental ray.)

If, however, you are a shader developer that want to write custom MetaSL shaders and render these in both mental ray and see them in the viewport, you need the mental mill "Standard Edition". This product can be purchased over the newly snazzily updated www.mentalimages.com website.

Enjoy the fun!

/Z

2009-04-27

my mental ray talk at the End User Event

Hello Everyone!

Those of you who enjoy watching me ramble endlessly (yes, such people exist), and don't think traveling to Utrecht (A short 30 minute train ride outside of Amsterdam), have nothing better to do on the 28:th and 29:th of May, and think the idea of a whole bunch of cool 3D people meeting in an actual bar is a good idea, should probably check out the End User Event


We'll all meet here, at the Florin


This event is arranged by my good friend Joep van der Steen, author of the book "Rendering with mental ray & 3ds Max. The event is a kind of meet-and-greet get-together combined with a bunch of masterclasses and talks; sort of like a microscopic version of SIGGRAPH, but in a small Dutch bar in a very nice (not so) little town.

Feel free to sign up at www.EndUserEvent.com, I think you will find it an enjoyable experience, and there is many things to learn...


Speakers include yours truly (about mental ray), my collegue Ruediger Raab (about mental mill and MetaSL), as well as many other great people like Ted Boardman (depicted on the right), Niel Blevins, Allan McKay, as well as Ken Pimentel, product manager for 3ds Max, and many many others.

I'm doing two sessions there:

* Gamma and Linear Workflow
* mental ray production rendering tricks & tips

Meet you there! Sign up now while seats remain!

/Z

2009-04-21

Fantastic Plants


Click the image above to see one of the most amazing foliage/grass/etc rendering I ever saw, any renderer, any time. To know it was done with sun&sky, mia_material, and mental ray, warms my heart.

Five stars. Times ten.

/Z

2009-04-02

FumeFX for mental ray Released

...some time ago, it seems. And I forgot to post about it - sorry.

For those who saw me demonstrating FumeFX rendering in mental ray in singapore, or heard me blabbing about it elsewhere, well, maybe I should have mentioned that it is now actually released? Well it is. Head over to Sitni Sati for a look:

www.AfterWorks.com


Enjoy.

/Z

2009-02-25

Benjamin Buttons Beautiful Bytes

Sorry for not posting for so long, I've been busy. Me being busy is often a good thing for all of you reading, although it tends to take a while from me being busy until you notice. Since what I'm doing isn't out there yet, lets ramble about something else instead:

Recently, a movie went up in theaters called "The Curious Case of Benjamin Button" starring some guy named Brad Pitt ... Hmm, that sounds familiar somehow... :)


Anyway, I have a special relationship with the effects in this film, because all the pretty stuff you see is done in mental ray, which makes me happy. (Yeah, I'm easy to please that way, LOL).

There is an almost ridiculously pretty website dedicated to The Visual Effects of Benjamin Button that I suggest you visit, if not only for the beautiful design of the site itself.

Digital Age


A lot of the "old benjamin" work was done by Digital Domain, and I suggest you check out their very cool breakdown of the process. Brad Pitt's digital head replacement was rendered in mental ray and is, I must say, probably one of the best skin shadings put to film to date.

Digital Youth


Hydraulx, and their sister company Lola did a lot of the "youthenizing" effects both on Pitt and Blanchett. I actually had the pleasure to see first hand the de-aging work on Pitt when I visited Hydraulx (which can be witnessed earlier in this very blog), and I had no idea at the time of the significance of the de-aged Brad Pitt I was being shown.

What was truly interesting about the Lola de-aging process is how manual it is. Its as far from "push a button and the computer does the work" that it can possibly be. Quite the opposite, it's nearly a matter of pulling every pixel manually from one place to another, the computer just helps with doing it over multiple frames, but even that requires TLC to look nice. I applaud the work here.

And Hydraulx/Lola also did digital head replacements of Kate Blanchett onto a professional ballerinas body, again using mental ray, and good 'ole misss_fast_skin shaders.

The Digital Skinny


Its fun for me, as the father of the good o'le mental ray skin shader, to see my little baby all grown up.

When I was in Singapore (see earlier in this blog) I met with Paul Hellard and friends from Ballistic Publishing and flipped through almost every one of their various computer art books (which I suggest y'all go and buy because they are exquisitly printed), I couldn't help but notice (to my poorly hidden personal glee) the amount of character renderings that were done in mental ray and with my o'le honey misss_fast_skin shader.

If you havn't checked out the mental ray skin shader, I suggest you try it, there are some posts in this very blog about it (searching for "skin" is a good start).

I close off this post with a video from TED.COM (if you are not a TED nut, I invite you to be one from today) about giving Benjamin Button his face.


I hope to be posting more again Real Soon. Meanwhile, follow me on twitter for shorter bursts of randomness that doesn't go into this blog.

Thank you for your time!

/Z

2008-12-22

Merry Christmas Post


My render from Jeremy Birn's lighting challenge


'ello 'everybody, and merry christmas, and all that Jazz!


Yes, I'm back from SIGGRAPH ASIA in Singapore. I couldn't get so much net connection so there wasn't much of the promised "reporting"; I apologize profusely. For the totally curious, there are some random pictures here and some cellphone video here.

SIGGRAPH ASIA was overall a very nice experience. It was small (Pixars Tony Apocada compared it to "US Siggraph 10 years ago") which was a good thing - the US SIGGRAPH's tend to overwhelm. Only drawback of Singapore; drinks way too expensive ;)

And there was an Electronic Theatre (see last post)!

The Masterclass went very well, many special thanks to Mike Seymour from FXGuide who not only was my MC for the Masterclass, but also kept up with my 175 page powerpoint, and knew which page I had to return to when Powerpoint decided to crash yet-another-time. Note to Self: Keynote, pre-prepared DVD, or anything... ANYTHING but Powerpoints next time!

Speaking of next time, unless the economy implodes further, I'm tentatively signed up for doing a class next year in New Orleans. Nothing signed up for next SIGGRAPH ASIA in Yokohama, Japan, though.

For me, I will be trying to spend the remaining shivering pieces of the year w. my family, enjoy the festivities, eat the stuff we Swedes eat, and celebrate the most holy thing on Swedish Christmas: Donald Duck.

I part with a little Christmas Gift from (again) my friends at Blur Studios (who I must add was a great help in providing me with eyecandy for my Siggie presentations); you may recall I posted a while back about an event where they talked about their Warhammer cinematic. Well, this event was filmed and is now available online, clikety here and enjoy over 2 hours of rendering, animation, crowd/hair/cloth sim, modelling and rigging geekiness!

With that, I bid adieu for 2008.

Marry X-mas and a happy new year!

/Z

2008-12-13

Electronic Theatre FTW!


I sit here outside the Eletronic Theatre at Siggraph Asia 2008 posting this, waiting to get in. The Electronic Theatre has always been a cherished Siggraph event, the highlight of the entire conference.

Yet, this year, in Los Angeles, there wasn't one. In the opinion of me, and many others, this was a disasterous move.

My good friend Mike Seymour from FXGuide (who was also nice enough to MC my Masterclass) has started an online petition to bring it back, so when we go to New Orleans in 2009, this Gem of the computer graphics industry will be back in it's proper forum, to spread the digital joy we all so desperately crave (oh, how poetic!).

So please, if you are a Siggraph nut, head over to and sign it.

Thanks. I'll now go in and enjoy the show...

/Z

2008-12-10

Singapore Setup Session

Duncan Brinsmead

I arrived alive and well in Singapore, almost immediately ran into Duncan Brinsmead from Autodesk (pictured here on the left) and since we had some free time we walked around Singapore, and even took a trip on the "Singapore Flyer", which is the Singaporean version of the London Eye thingy.

As it happens, both Duncan and myself are doing presentations at tonights Autodesk User Group event.

So for us, today is "Teh Big Setup Day" for this presentations, as well as the booth theatere stuff.

For most of the week, I'll be alternating between the Autodesk and NVidia booths. I also hear Autodesk is streaming their booth theatre presentations over the net this year (see link below).

Convention Center

On Friday december 12:th, the 3 hour version of my "Miracles and Magic" mental ray masterclass will be held. It's in the convention center, but note it's an Autodesk masterclass and hence requires a ticket beyond the siggraph one.


More information on User Group event, Masterclasses, and Streaming..


/Z

2008-12-07

Up up and away....

2008/12/07

I'm at the airport awating my first airlift enroute to SIGGRAPH ASIA in Singapore.

As a precaution, I took the photo on the right of my bag, so if it gets lost, I can show people what it looks like ;)

Smaller updates of my travels and wherabouts will be on Twitter, so follow me there, please.

If I am in Wifi range, I may show up on the FRING thingamabob on the right side.

Also, there may be QiK updates now and then.... stay tuned, same zap time, same zap channel....


/Z

2008-12-03

Event: December 4:th: An Evening with Blur Studios

On thursday, december 4:th, 2008, Blur Studios will hold a presentation about their "Warhammer Online" cinematic, and how they used mental ray for all of it.


The event is in Hollywood, CA, and is free of charge.

Details are here.

UPDATE: The event is now online here

/Z

2008-11-21

Singapore Sling: SIGGRAPH ASIA 2008

In December, I am flying to Singapore to attend SIGGRAPH ASIA.


Singapore. I think.


This will really be my first visit to this corner of the world, so it will be interesting. Assuming the current planning remains, you can most likely find me around our mental images corner of the NVidia booth, as well as doing mental ray demos in the Autodesk booth. I'll be tweeting as well, as usual.

Among other things, one thing I will be doing at SIG' ASIA is to do a re-run of my masterclass from SIGGRAPH 2008 in Los Angeles, entitled "Miracles and Magic".

It was clear I had tried to cram way too much stuff to fit in the 1.5 hours I had; I had to skip every single live demo, and leapfrog little gems to just to get through it all. But I did get through it all, at a breakneck pace.

The Audience looked somewhat like this:


So... the idea here is to re-do pretty much the same masterclass, but as a 3 hour version. This would give us a more ... relaxed... pace, and the demo bits would actually fit!

So, to be totally clear. If you were at my Autodesk masterclass (not the "SIGGRAPH Course" on "HDRI for Artists") held at the Westin Bonaventure in Los Angeles, you already saw this, but very ... quickly. :)

So if you weren't in L.A, and are interested in the same topics, feel free to attend. The blurb for the class reads as follows:


  • The course will focus on photo-realistic rendering in mental ray in the context of visual effects, as well as for product and architectural visualization. The session will open with a quick introduction to photometric concepts followed by a practical guide to a linear workflow and why proper gamma correction is imperative. It will then move on to efficient techniques for achieving highly realistic results when combining CG and live action by combining existing tools together (e.g. the architectural and production shader libraries), techniques for rendering flicker-free animations with Final Gathering, and tips for conserving memory.


For more information about attending the Autodesk Master Classes, go here.

/Z

2008-11-05

The Joy of a little "Ambience"...

As usual, when the same question pops up in multiple places, I tend to turn this into a blog post. The question I was asked recently was how to use ambient light in mental ray (specifically, in mental ray in 3ds Max), because people were confused about the lack of an "ambient" slot in, say, the mia_material (Arch & Design) shader.

I will try to explain this here.

THEORY: "Ambient Light" and "Occlusion" - a primer


Back in the day...


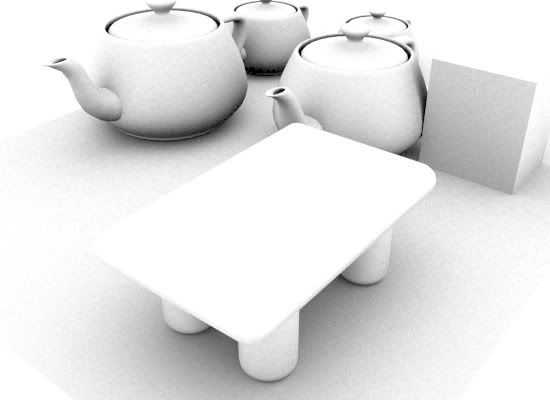
Traditional computer graphics, with no indirect lighting of any kind, would by default look like this; here's a scene lit with a single shadow-casting directional light:


I.e. shadows are pitch-black, with no realism whatsoever. You can't even tell that the yellowish rectangular thing at the bottom is a table that has legs!

So a couple of tricks were introduced. One ugly, unrealistic hack was "shadow density", i.e. the ability to say "when light from this light is in shadow, only x% of it actually disappear". So you could set things like "Shadow Color" and "Shadow Density", which you all understand is completely absurd and totally contrary to any form of sanity and logic.

An opaque object either blocks light, or it doesn't - it doesn't just randomly go "Oh I block 47% of the light". That can't happen (outside of actually transparent objects).

RULE#1: Never, ever, no matter how "old-school" your rendering techniques are, use "shadow color" or "shadow density" settings. Ever. Trust me on this.

Enter "Ambient" light


"But", these early CG people said, "outdoors shadows from the sun is slighlty blue, shouldn't I set a shadow density and color to get my blue shadows"?

NO!!

The reason "shadows are blue" is because they are filled in by blue light from the sky.

Now, our early CG pioneers understood this, of course, so rather than the horrendeos hack of "shadow color", they introduced a nearly-as-horrendous hack: Ambient Light.

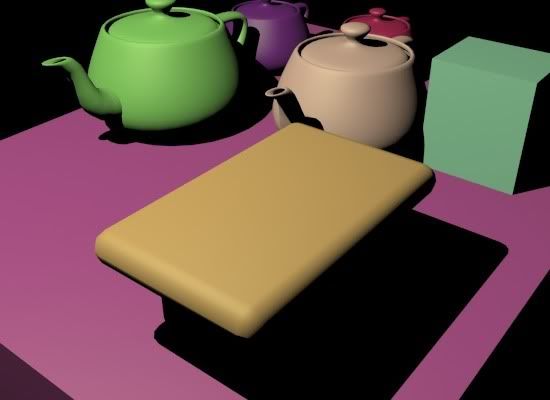
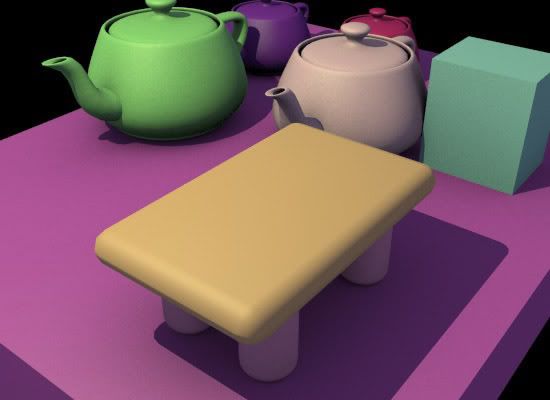
But the problem was, this "Ambient Light" was ever-present and uniform, and yielded a totally unrealistic and unsatisfactory result when used on it's own, something like this:


That looks about as horrible as the original: Sure, you can see something in the shadows - but it's all totally uniformly lit. The "legs" of our table can now be seen... but as totally uniformly colored blobs, with nothing to reveal their shape.

Are these round legs, or are they flat oval things, or what are those? Does the legs touch the floor, or are they hovering above it? The purple teapot looks almost flying, because the shadow behind the green teapot is just a flat color.

The problem here is that light is hitting every point uniformly, with no regard to the position or angle of the surfaces. But if we are trying so simulate "blueish light from the sky", then a point that is exposed to a lot of the sky will receive more light, than a point that is beind a bunch of other objects that are blocking (i.e. "occluding") the skylight.

Enter "Occlusion"


Luckily, some bright people at ILM back in 2002 when they were working on "Pearl Harbor" invented (using mental ray, I should add) something called "Ambient Occlusion". Basically, they wrote a shader that figure out how "occluded" a certain point was, i.e. how much stuff was "blocking light from arriving" at that point. This "Occlusion" on it's own looks like this:


Combining "Ambient" and "Occusion"


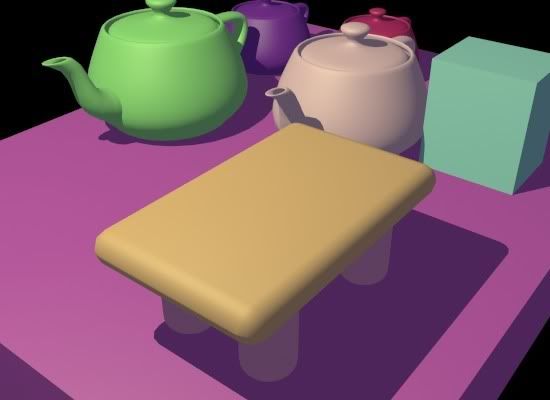
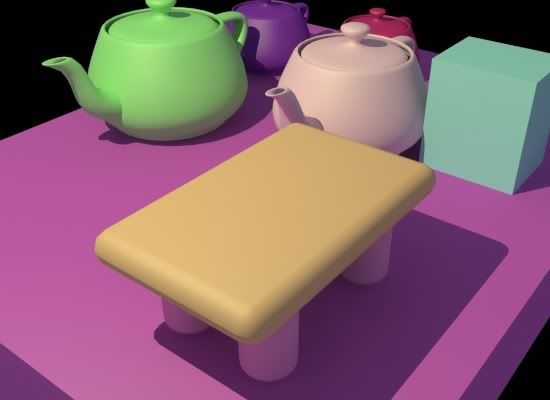
Now, if you apply this to the Ambient term, you get this very much nicer image:


See how beautifully the details resolve; the legs of the table now correclty reads as "contacting" the floor; the shape of the legs can be perceived. The area between the teapots is properly darkened, and the teapots have nice contact shadows.

The above is how it should be done!

Doing it the WRONG way


However, unfortunatly, many people have read and misunderstood the original ILM documents on Ambient Occlusion, and apply the Occlusion pass across the entire rendering. This is W R O N G!!

I.e. people make "plain" render (including ambient light and everything), make an occlusion pass, and just multiply the two in post!

The result is that you get a deceptively-sort-of-okay-but-somwhat-wrong looking result like this:


Notice how this has a "dirty" feel. This is because the occlusion pass (pictured above) was applied on top of the entire image, affecing the "ambient" light as well as the directional light.

But this makes no sense; the "occlusion" of the directional light is already taken into account - that's what the shadow of the light is. Ambient occlusion isn't called "ambient occlusion" for no reason; it's supposed to be applied to the "ambient" term, i.e. the "omnidirectional surrounding light", not to any direct lights.

But in the above image you will see darkening on floor in front of the objects, making it appear "dirty". Similarly, there is a bad looking "dirt-shadow" of the teapots spout on the front of the teapots. And so on.

SO: Globally multiplying occlusion on top of the beauty pass (including reflections, direct light, etc) is WRONG. Don't do it.

But isn't this all fake? Why are we doing it?


Now... all we are doing with our "ambient" light and the "occlusion" is simulating "omnipresent light" (i.e. light from the environment) as well as "bounce light" (from other objects). Lets compare the result with actually calculating omnipresent light and bounce light; i.e. use Final Gathering and calculate it FOR REAL:


The above image uses FG and a 3ds Max "Skylight" (i.e. light from the environment in XSI or Maya) to introduce the same kind of light we tried to "fake" with the "ambient" light - but correctly. And with true indirect bounces!

So this results begs the question; when we so easily can get the correct result, why would we still want to go the "fake" route?

There are a couple of answers:


  • FG is an interpolated technique. This means that the indirect lighting is sub-sampled (calculated less than for every pixel) and the values between those are interpolated. However, if you are doing an animation, and the result between two frames are slightly different (for whatever reason), this may - hypothetically - cause not one pixel to change, but a large area of pixels to change (i.e. all pixels influenced by the interpolation of that FG point).

    The result, in a final animation, will be visible flicker. Visible, because it is "macroscopic", i.e. larger than a pixel, and perceived as "scintillation" or "flicker", which is visually unappealing.

    Contrast this with using the occlusion technique: It is calculated for every pixel (every sample, even), and hence, any noise in this calculation is of sub-pixel size. I.e. a difference from one frame or another will only affect at most one pixel, and mostly just a fragment of a pixel.

    The result is that this perceived more as "film grain", and is much less visually objectionable.


  • We may actually want to combine both "real" and "fake"; this is a method I often advocate.

    You use FG at a low density and with high interpolation, and you apply your occlusion on top of this indirect light, rather than some homemade, arbitrarily invented "ambient" light. This relieves you of the responsibility of having to figure out the proper intensity and color of this mythical "ambient light" - it is calculated for you.

    And of course, this combo method is a built in as a feature in Arch&Design/mia_material...


PRACTICE: How do we actually do this?


Since the original questions was in a 3ds Max context, I will answer (for now) in a 3ds Max context, but also mention the methods for XSI and Maya in the text.

There are three basic methods to apply ambient light:

  1. Use the built in AO of Arch&Design/mia_material and utilize it's "Ambient" parameter
  2. Use a light set to "Ambient Only"
  3. Use a light with the Ambient/Reflective Occlusion shader as light shader.


Method #1: Arch&Design (mia_material) ambience


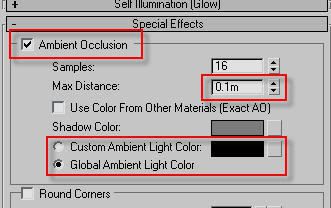
This method allows you either per-material or global ambient light levels, and you can easily modify the ambient occlusion radius from the rollout:


  • Open the material in the material editor
  • Go to the "Special Effects" rollout.
  • Turn on the "Ambient Occlusion" and...

    • ...EITHER put in a given ambient light color in the material...
    • ...OR: switch to the "global" mode, which will use the "ambient" color and intensity from the Environment dialog box:


In XSI and Maya this means enabling the built in AO of mia_material, and setting the "ao_ambient" parameter to the color of your desired ambient light.

Method #2: "Ambient Only" light


(AFAIK, this specific method only works in 3ds Max. Correct me if I am wrong.)


  • Create an Omni
  • In it's Advanced rollout, set the light to "Ambient Only"


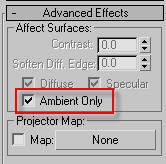
This gives you plain (flat) ambient light with no occlusion.

To get the occlusion effect by adding the Ambient/Reflective Occlusion shader as the "Projector Map" of the light.

BUT - There is a big BUT - For this to work, you MUST have the light with it's transformation reset, i.e. it must be placed at 0,0,0 in the top viewport, or the ambient occlusion shader will be confused.

Doing this manually is tricky; so it can be done much easier with a script:


myLight = Omnilight()
myLight.AmbientOnly = true
myLight.projectorMap = Ambient_Reflective_Occlusion__3dsmax()


To run this script:


  • Go to MaxScript menu
  • choose "New Script"
  • paste the above snippet in
  • hit CTRL-E


You will now have a set up light, where you can modify it's intensity and color etc. w. the normal 3ds max light features. The only thing you need to look out for is if you wan to set the distance for the ambient occlusion rays, you must


  • take the Ambient/Reflective Occlusion shader that is in the projector map
  • drag-and-drop it into the material editor
  • choose "Instance"
  • ...and modify the settings from the material editor


Method #3: "Ambient Only" light w. occlusion shader as light shader


There is actually a Method#3 which is similar to Method #2, except rather than placing the Ambient/Reflective Occlusion shader in the "Projection Map" slot, you use that shader as the light shader of the light itself.

A quirk of this methods is that now the shader completely replaces all the settings of the light; all controls for color, intensity, etc. stop working, and you need to do all changes to the light intensity and color by modifying the color of the "bright" slot of the occlusion shader itself (by putting it in material editor, as above).

This method has the benefit of not requiring the strange "light has to be in 0,0,0" requirement, plus that it is a method that works as well in Maya and XSI. To do this in XSI or Maya:


  • Create an area light
  • Set it's area light type to "User" and 1 sample
  • Use the mib_amb_occlusion shader as the light shader of the light


Similar to 3ds Max, changes to the "ambient light level" will now have to be done entirely from inside the occlusion shader.

Hope this helps.

Mo' later.

/Z